Reading diagnostic trouble codes from your vehicle is simpler than you might think, thanks to OBD2 scan tools. These handy devices allow you to communicate with your car’s computer and understand what those warning lights on your dashboard are trying to tell you. This guide will walk you through the basic steps of how to use an OBD2 scan tool to retrieve diagnostic trouble codes.
Step 1: Locating the OBD2 Port
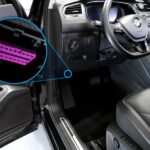
The first step is to find your vehicle’s OBD2 port. It’s typically located under the dashboard on the driver’s side. Look for a 16-pin connector, which is often trapezoidal in shape. The location can vary slightly depending on the vehicle make and model, but it’s usually within easy reach from the driver’s seat.
Step 2: Connecting the OBD2 Scan Tool
Once you’ve located the OBD2 port, take your OBD2 scan tool and firmly plug it into the port. Ensure it’s securely connected. You should feel a click or some resistance, indicating a proper connection.
Step 3: Turning on the Ignition and Establishing Communication
Now, turn your vehicle’s ignition to the ON or IDLE position. This means turning the key so that the dashboard lights come on, but the engine is not necessarily running (unless you choose the IDLE position which means engine running). This step is crucial as it powers up your car’s computer and allows the scan tool to establish communication. Most OBD2 scan tools will automatically detect your vehicle’s VIN (Vehicle Identification Number) and then begin communicating with the vehicle’s computer system to retrieve data.
It’s worth noting that some advanced features on certain scan tools may require the engine to be running. If your scan tool has such features and requires the engine to be running, always start the engine first, and then connect the scan tool.
Step 4: Reading Diagnostic Trouble Codes (DTCs)
After the scan tool successfully communicates with your vehicle, it will typically display any stored diagnostic trouble codes (DTCs) directly on its screen. These codes are often presented in order of severity and are accompanied by a brief description of the issue they represent.
Use the UP and DOWN buttons on your scan tool to scroll through all the detected codes if there are multiple. To explore further diagnostic options, look for a System Status button, often located on the side of the scan tool. This button usually allows you to access different vehicle systems, such as global OBD2 (Check Engine) codes and ABS (Anti-lock Brake System) codes. Use the navigation buttons to select the system you want to investigate and press ENTER to proceed.
Step 5: Disconnecting the Scan Tool
Once you have finished reviewing the diagnostic trouble codes and any other relevant information, you can safely disconnect the OBD2 scan tool. Before disconnecting, make sure to turn the vehicle’s ignition OFF. The scan tool will typically store the vehicle data in its memory, allowing you to review it later if needed.
By following these simple steps, you can effectively use an OBD2 scan tool to diagnose basic issues with your vehicle right at home.