For Toyota 4Runner owners from 2004 onwards, checking the transmission fluid level presents a unique challenge due to the sealed transmission design, which lacks a traditional dipstick. Maintaining the correct fluid level is crucial, and it requires checking the overflow plug within a specific temperature range. For instance, my 2007 4Runner’s Factory Service Manual dictates a temperature range of 115F to 130F for A750E and A750F transmissions. Always verify the precise temperature range for your specific 4Runner model before proceeding. The primary hurdle then becomes: how can you accurately monitor the transmission fluid temperature to ensure it’s within the correct range for a proper check?
While less accurate infrared thermometers aimed at the transmission pan are sometimes used, their reliability is often questioned. Therefore, this guide will focus on two more dependable methods for monitoring your 4Runner’s transmission temperature. The first is a cost-effective, albeit slightly more involved, method using a simple paperclip. The second, and personally preferred method for its ease of use and real-time monitoring capabilities, involves using an OBD2 Bluetooth adapter, such as the BAFX Products Android Wireless Bluetooth OBD2 Scanner, and a smartphone app. Let’s delve into both approaches to help you accurately check your Toyota 4Runner’s transmission fluid temperature.
Using a Paperclip for Transmission Temp Check
The most economical method to enter Transmission Temperature Check Mode on your Toyota 4Runner involves just a paperclip and utilizes the vehicle’s OBD port. This technique, detailed in the Toyota Factory Service Manual, requires starting with a cold transmission. The process relies on observing dashboard indicator lights that signal the start of the check mode, reaching the minimum temperature, and hitting the maximum temperature of the acceptable range, all while the engine idles. This might take anywhere from 10 to 15 minutes depending on ambient temperature and vehicle conditions.
Here are the steps outlined in the Factory Service Manual for my 2007 Toyota 4Runner, which are generally applicable to other 4th Generation (and potentially 5th Gen*) models:
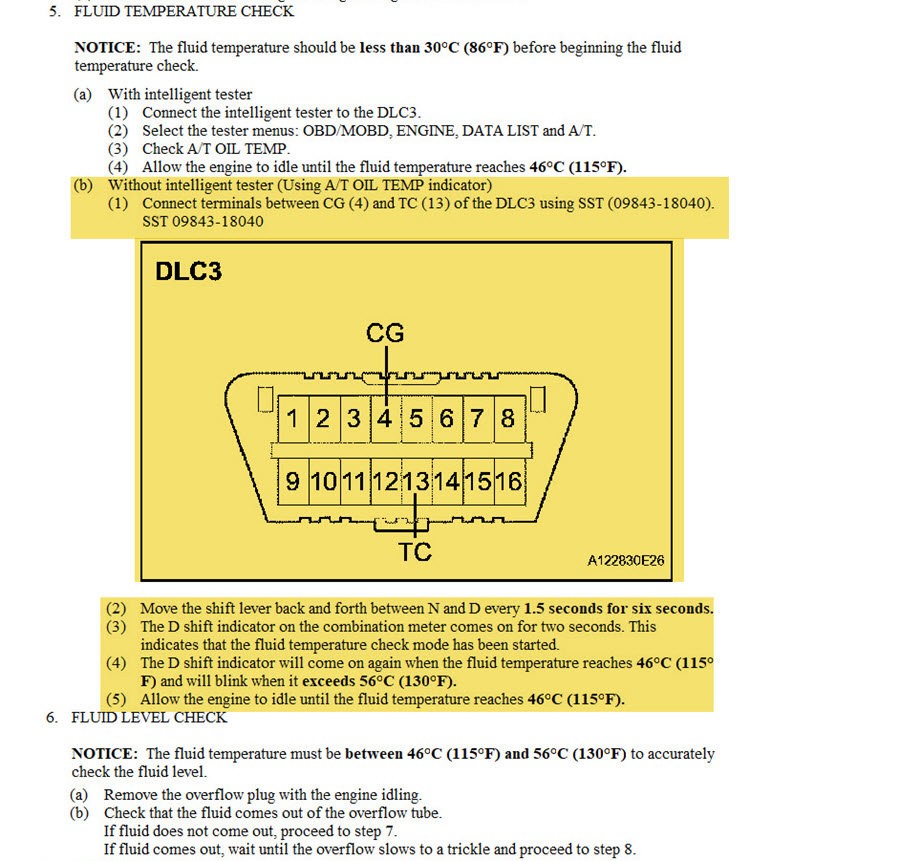
For this method, you’ll need to locate the OBD port in your 4Runner. It’s important to note that in some models, like my 2007 4Runner, the OBD port might be oriented upside down compared to the diagram in the manual. Regardless of the orientation, you need to correctly identify terminals 4 and 13. Using a paperclip bent into a U-shape, create a jumper wire to connect these two terminals in the OBD port as shown:
Once the jumper is securely in place, start your 4Runner’s engine. You will observe the dashboard lights flashing – this is a normal indication that the system is active. Now, shift the gear selector between Neutral and Drive repeatedly every 1.5 seconds for a total of 6 seconds. After this sequence, the ‘D’ drive indicator or the ‘A/T Oil Temp’ light on your dashboard will illuminate for approximately 2 seconds and then turn off. This confirms that your 4Runner has successfully entered Toyota’s Transmission Temperature Check Mode. In my 2007 Limited 4Runner, it’s the ‘A/T Oil Temp’ light that serves as the indicator, even though the manual excerpt mentions the ‘Drive’ indicator.
At this point, remove the paperclip jumper. Allow the engine to continue idling, and wait for the ‘D’ or ‘A/T Oil Temp’ light to illuminate steadily. This steady light indicates that the transmission fluid has reached the minimum temperature required to perform a fluid level check. Be prepared with your tools and a catch pan positioned beneath the overflow plug. As soon as the light becomes steady, you have a window of opportunity to perform the check before the light starts flashing, which signals that the fluid temperature has exceeded the maximum limit for an accurate reading.
For a visual guide, you can also refer to this helpful video by TheCarCareNut explaining the OBD jumper method. Combining the Factory Service Manual instructions, the visual aids here, and TheCarCareNut’s video, you should be well-equipped to perform this procedure. It’s advisable to practice the steps beforehand and consider having a helper, one to monitor the dash lights and another ready to check the fluid level when the signal is given.
Monitoring Transmission Temp with BAFX OBD2 and Torque Pro
For a more user-friendly and versatile approach to monitoring your Toyota 4Runner’s transmission temperature, consider using an OBD2 Bluetooth adapter and a smartphone app. This method, while requiring a small investment, offers real-time temperature monitoring, even while driving. For this, you will need two key components:
(a) An ELM327 compliant OBDII Bluetooth dongle: Devices like the BAFX Products Android Wireless Bluetooth OBD2 Scanner are readily available online. I personally use the BAFX adapter, which provides reliable performance.
(b) The Torque Pro app for Android: This powerful app, available for a small fee on the Google Play Store, allows you to customize dashboards and monitor a wide range of vehicle parameters, including transmission temperature, when paired with an OBD2 adapter.
The initial setup involves plugging the BAFX OBD2 dongle into your 4Runner’s OBD port and turning the ignition to the ‘On’ position. Then, on your Android device, navigate to the Bluetooth settings and pair with the OBD2 device. Consult the instructions that come with your BAFX adapter for the specific device name to look for during pairing.
Next, open the Torque Pro app. If you’re a first-time user, you’ll need to set up your vehicle profile within the app. Once your profile is set, from the main Torque Pro screen, tap the gear icon (menu button) > Settings > “Manage extra PIDs/Sensors”. On the subsequent screen, press the menu button again > “Add custom PID” > “OK”.
Now you’ll need to input the custom PID (Parameter ID) data to specifically monitor your 4Runner’s transmission temperature. For 4th Generation Toyota 4Runners (2004-2009), use the following settings:
- OBD2 Mode and PID:
21d9 - Long Name: (e.g., Trans Temp) – User-defined
- Short Name: (e.g., Trans Temp) – User-defined
- Minimum Value:
0 - Maximum Value:
300 - Scale factor:
x1 - Unit type:
F - Equation:
(((((G*256)+H)*(7/100))-400)/10)
Ensure you enter the equation precisely as shown, including all five opening parentheses and no spaces. A green checkmark should appear next to the equation once it’s correctly inputted. Click “OK” to save the custom PID.
With the custom PID defined, the final step is to add a gauge to your Torque Pro dashboard to display the transmission temperature. From the main screen, select ‘Realtime Information’. On the next screen, tap the gear/menu icon > ‘Add display’. Choose your preferred display style (e.g., ‘Digital display’). Select the custom sensor you just created (named as your ‘Long Name’, e.g., ‘Trans Temp’). Choose a widget size, and then place the new gauge on your dashboard.
This custom PID formula is verified to work for 2004-2009 4th Gen 4Runners. For 5th Generation 4Runners (2010 and newer), the custom PID data is slightly different:
- OBD2 Mode and PID:
2182 - Equation:
((((A*256)+B)*(7/100)-400)/10)
The other settings (Long Name, Short Name, Min/Max Value, Scale factor, Unit type) remain the same as for the 4th Gen PID setup.
Besides Torque Pro, other OBD2 apps like ‘OBD Fusion’ also support Toyota transmission temperature monitoring with ELM327 adapters. OBD Fusion typically requires purchasing the app and then an enhanced diagnostics add-on specific to your vehicle model to enable transmission temperature readings. If you prefer a potentially simpler setup process without manually entering custom PID equations, OBD Fusion might be a viable alternative.
In conclusion, whether you opt for the paperclip method or the BAFX OBD2 scanner with Torque Pro (or similar app), monitoring your Toyota 4Runner’s transmission temperature for fluid level checks is achievable. The OBD2 app method, leveraging a BAFX scanner, provides added convenience and real-time monitoring, making it particularly useful for regular checks and even while towing or during demanding driving conditions. Choose the method that best suits your needs and enjoy worry-free 4Running.