Building a car HUD (Heads-Up Display) using OBD2 connectivity opens up exciting possibilities for displaying real-time vehicle data directly in the driver’s line of sight. This project log details the journey of upgrading the display screen and ensuring a robust connection to the car’s OBD2 port.
Initially, a DIYMall OLED screen was tested, but unfortunately, it proved to be faulty. Despite successful initialization using DIYMall libraries, the screen only displayed random pixels that wouldn’t turn off. This setback highlighted the importance of component reliability in such projects.
To ensure a dependable display, a switch was made to a highly-rated OLED screen specifically designed for compatibility with the Adafruit OLED screen library. This new screen promises better performance and easier integration, crucial for a successful Car Hud Obd2 system.
Safety is paramount when working with car electronics. To protect the circuit, especially the +12V power supply from the car’s OBD2 port, a 2A fast blow fuse was incorporated. Unlike standard car fuses, this fast blow fuse and PCB mounts offer precise and rapid protection against current surges, adding a layer of security to the car hud obd2 setup. The fuses themselves are compact and efficient for this application.
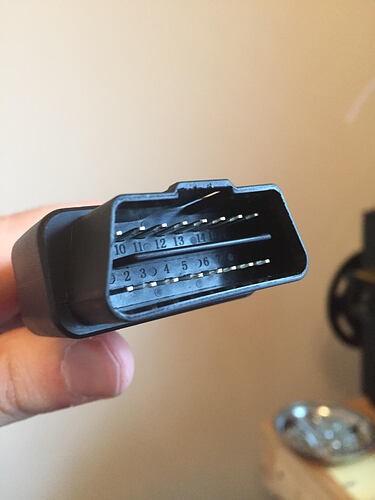
Connecting to the car’s OBD2 port requires careful attention to the pinout. The car-side OBDII connector pinout reveals that only a few pins are essential for this car HUD obd2 project: +12V power, Chassis Ground, Signal Ground, CAN High, and CAN Low. These pins are the communication and power lifelines for retrieving vehicle data.
An OBDII extension cable is being used to facilitate easier access and testing. To ensure correct wiring, each pin on the extension plug was meticulously identified. Using a multimeter, each wire was traced back to its corresponding pin number. Tape and a marker were used to clearly label each wire, a crucial step for reliable OBD2 communication.
For the HUD display itself, an unconventional but potentially effective idea emerged: using a scope lens protector typically used for gun sights. These protectors are small, transparent pieces of glass or plastic designed to mount on rails and withstand outdoor conditions. This scope lens protector could offer a compact and durable solution for projecting the OLED display, perfectly suited for a DIY car hud obd2.
The next steps in this car HUD obd2 project involve connecting the labeled OBDII extension plug to the car’s OBD2 port to validate the connections and thoroughly testing the new OLED screen to ensure it functions as expected. These tests will be crucial in moving forward with the integration and realization of a functional and informative car HUD.