When your Dodge vehicle throws a P0113 code, it’s signaling a problem within your Intake Air Temperature (IAT) sensor circuit. This diagnostic trouble code (DTC) indicates a “high input” condition, meaning the sensor is reporting an unusually high temperature reading to the Powertrain Control Module (PCM). As an expert at obd-de.com, let’s delve into the diagnostic steps to resolve this issue and get your Dodge running smoothly again.
Understanding the P0113 Code and Your Dodge
The P0113 code specifically points to a malfunction in the IAT sensor circuit where the signal voltage is excessively high. The IAT sensor plays a crucial role in your engine’s performance. It measures the temperature of the air entering the intake manifold, providing essential data to the PCM. This information is vital for the PCM to calculate the correct air-fuel mixture and optimize ignition timing for efficient combustion.
A faulty IAT sensor reading, especially a high input as indicated by P0113, can lead to various drivability problems. Your Dodge might experience:
- Reduced engine performance: Incorrect air-fuel mixture can lead to sluggish acceleration and decreased power.
- Poor fuel economy: The engine might be running richer than necessary, wasting fuel.
- Difficulty starting: Inaccurate temperature readings can affect cold start performance.
- Check Engine Light illumination: The most obvious sign, the check engine light will illuminate on your dashboard.
Diagnosing the P0113 Code on Your Dodge: A Step-by-Step Guide
Before we begin, ensure your safety:
WARNING: When working on your vehicle with the engine running, exercise extreme caution. Keep a safe distance from the cooling fan and moving engine parts. Avoid wearing loose clothing and ensure no tools or objects can fall into the engine bay. Failure to heed these warnings could result in serious injury.
NOTE: Prior to troubleshooting P0113, address any other Diagnostic Trouble Codes (DTCs) related to system voltage issues. A stable system voltage is crucial for accurate sensor readings.
Here’s a systematic approach to diagnosing the P0113 code on your Dodge:
Step 1: Verify Active DTC
- Start your Dodge’s engine and allow it to reach its normal operating temperature.
- Using a scan tool, access the vehicle’s computer and select the “View DTCs” or similar function.
- Check if the P0113 code is currently marked as “Active.”
Is the status Active for DTC P0113?
- Yes: Proceed to the next step in diagnosis.
- No: The fault may be intermittent. Further investigation into the history of the code and potential wiring issues might be needed.
Step 2: Check for Short to Voltage in the IAT Signal Circuit (K21)
This step investigates if the signal wire from the IAT sensor is unintentionally receiving voltage, causing a high reading.
- Turn the ignition switch to the “OFF” position.
- Locate and disconnect the electrical connector from the Intake Air Temperature Sensor.
- Disconnect the Powertrain Control Module (PCM) connector. This is crucial for preventing accidental shorts during testing.
- Turn the ignition switch to the “ON” position (engine off).
- Using a voltmeter, measure the voltage on the (K21) IAT Signal circuit pin in the Intake Air Temperature Sensor harness connector.
Is voltage present on the (K21) IAT Signal circuit?
- Yes: This indicates a short to voltage in the (K21) IAT Signal circuit. Repair the circuit to eliminate the short. After repair, perform the PCM Verification Test as outlined in your Dodge service manual.
- No: Proceed to Step 3.
Step 3: Test for Open or High Resistance in the IAT Signal Circuit (K21)
This step checks if there’s a break or excessive resistance in the signal wire, which can also lead to incorrect readings.
-
Turn the ignition switch to the “OFF” position.
CAUTION: Avoid probing directly into the PCM harness connectors with standard probes. This can damage the delicate PCM terminals and lead to poor connections. Use a breakout box or specialized test leads like Miller Special Tool #8815 for PCM connector testing if necessary. For most DIYers and technicians, careful back-probing or using fine probes will suffice, but exercise caution.
-
Measure the resistance of the (K21) IAT Signal circuit between the IAT sensor harness connector pin and the corresponding pin at the PCM connector (using a wiring diagram for pin identification). If you are not using a breakout box, you will be measuring resistance to the disconnected PCM connector pin.
Is the resistance below 5.0 ohms?
- Yes: The circuit resistance is acceptable. Proceed to Step 4.
- No: There is likely an open circuit or high resistance in the (K21) IAT Signal circuit. Inspect the wiring for damage, corrosion, or loose connections. Repair the circuit and then perform the PCM Verification Test.
Step 4: Evaluate the Sensor Ground Circuit (K900) for Open or High Resistance
A proper ground is essential for accurate sensor readings. This step checks the integrity of the sensor ground circuit.
CAUTION: As mentioned before, avoid probing directly into the PCM harness connectors unless using appropriate tools to prevent damage.
- Measure the resistance of the (K900) Sensor Ground circuit between the IAT sensor harness connector pin and the corresponding ground pin at the PCM connector (or chassis ground if specified in the wiring diagram).
Is the resistance below 5.0 ohms?
- Yes: The ground circuit is good. Proceed to Step 5.
- No: There’s an issue with the (K900) Sensor Ground circuit. Repair the circuit for open or high resistance, ensuring a solid ground connection. Perform the PCM Verification Test after repairs.
Step 5: Test the Intake Air Temperature Sensor
If the wiring circuits are verified to be in good condition, the sensor itself becomes the prime suspect.
-
Turn the ignition switch to the “OFF” position.
-
Reconnect the Powertrain Control Module (PCM) connector.
-
Use a jumper wire to create a direct connection between the (K21) IAT Signal circuit pin and the (K900) Sensor Ground pin in the IAT sensor harness connector. This simulates a very low temperature reading to the PCM.
-
Turn the ignition switch to the “ON” position.
-
Using your scan tool, monitor the Intake Air Temperature Sensor signal voltage reading.
NOTE: With the jumper wire in place, the sensor voltage should read approximately 0.0 volts (with a tolerance of ± 0.1 volt).
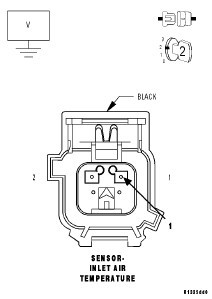
Image of IAT Sensor connector and wiring diagram reference for sensor test using jumper wire.
Does the scan tool display the voltage as described (approximately 0.0 volts)?
- Yes: This suggests the IAT sensor is faulty and is likely the cause of the P0113 code. Replace the Intake Air Temperature Sensor according to your Dodge service manual’s procedures. After replacement, perform the PCM Verification Test.
- No: Proceed to Step 6.
Step 6: Investigate the Powertrain Control Module (PCM)
If all preceding steps have not identified the problem, the PCM itself might be the source of the P0113 code, although this is less common.
- Using the appropriate wiring diagrams for your Dodge model, carefully inspect the wiring and connectors between the Intake Air Temperature Sensor and the Powertrain Control Module (PCM).
- Look for any signs of damage to the wires, such as chafing, piercing, pinching, or breaks.
- Check the terminals in the connectors for any bending, breakage, pushing out, or corrosion.
- While monitoring the scan tool data related to the IAT sensor circuit, perform a “wiggle test” on the wiring and connectors. Gently wiggle and flex the wiring harness and connectors to see if this action causes the sensor data to change or the P0113 DTC to reset.
- Consult any relevant Technical Service Bulletins (TSBs) for your Dodge model that might relate to P0113 or IAT sensor issues.
Were any problems found during the wiring and connector inspection or wiggle test?
- Yes: Repair any identified wiring or connector issues as necessary. After repairs, perform the PCM Verification Test.
- No: If no wiring or connector problems are found, and all other steps have been followed, the PCM might be faulty. Replacement and reprogramming of the Powertrain Control Module (PCM) may be necessary. Follow the procedures outlined in your Dodge service information for PCM replacement and programming. After PCM replacement, perform the PCM Verification Test.
Final Notes on Diagnosis
While specialized tools are mentioned in factory service procedures, for many tests, a quality Digital Volt-Ohm Meter (DVOM) and careful probing techniques can be sufficient. Be cautious not to damage connector pins. Straight pins or fine probes can be helpful for back-probing connectors without spreading the terminals.
Based on the diagnostic steps, a faulty IAT sensor is a common cause for the P0113 code. However, a thorough diagnosis following these steps is crucial to ensure the correct repair and resolve the issue effectively. Remember to always verify your repairs by clearing the DTC and performing a test drive to confirm the P0113 code does not return.