Experiencing a P0456 code on your BMW X3 can be frustrating. This OBD-II trouble code signals a “small evaporative emission system leak,” which, while seemingly minor, can prevent your vehicle from passing emissions tests and indicate a problem within your car’s fuel vapor recovery system. If you’re a BMW X3 (specifically the F25 model) owner encountering this issue, you might be relieved to know that a DIY fix could be within reach. This guide, based on a real-world repair experience, will walk you through resolving a P0456 code by replacing the Fuel Vapor Leak Detection Pump (NVLD) – a common culprit in these scenarios.
Understanding Code P0456 and Your BMW’s EVAP System
The P0456 code indicates that your BMW’s Engine Control Unit (ECU) has detected a small leak in the Evaporative Emission Control System (EVAP). This system is designed to prevent fuel vapors from escaping into the atmosphere. A crucial component of this system is the NVLD pump. The NVLD, or Fuel Vapor Detection Pump, is responsible for testing the EVAP system for leaks. When it detects a leak, or if the pump itself malfunctions, it can trigger the P0456 code and illuminate your check engine light.
While a P0456 code points to a small leak, pinpointing the exact location can be tricky. Common causes range from something as simple as a loose gas cap to more complex issues like cracked hoses or a faulty NVLD pump.
Diagnosing P0456 on Your BMW X3
Before diving into replacing parts, it’s wise to start with the simplest and most common fix: checking your gas cap. Ensure it’s properly tightened and in good condition. A loose or faulty gas cap is a frequent cause of small EVAP leaks and the P0456 code. In many cases, simply tightening or replacing the gas cap can resolve the issue.
However, if tightening or replacing your gas cap doesn’t clear the P0456 code after a short driving period, the problem may lie elsewhere. For BMW X3 models, especially those with higher mileage, a failing NVLD pump is a known potential cause. If you’ve ruled out the gas cap and are still facing the P0456 code, consider the NVLD as a likely suspect.
DIY Replacement of the NVLD on BMW X3 (F25)
This guide focuses on replacing the NVLD on a BMW X3 F25 model, specifically a 2013 xDrive35i N55. While specific steps might slightly vary for other models or years, the general principle remains similar.
Tools and Parts You’ll Need:
- New NVLD Pump (Part number – 16137333301 or compatible. Always verify compatibility with your specific BMW model).
- 10mm socket wrench.
- T15 Torx screwdriver.
- Replacement rivets (BMW part numbers: White – 07147391323, Black – 51777171004).
- Riveter (for installing new rivets).
- Hose clamp (standard worm drive clamp as replacement for original one-time use clamp).
- Basic hand tools (screwdrivers, pliers).
Step-by-Step Guide:
Step 1: Accessing the NVLD
The NVLD pump is located in the rear right passenger wheel well, positioned beneath the fuel filler port.
- Locate the right rear wheel well: This is the area you’ll be working in.
- Remove the fender liner: You’ll need to remove the fender liner to gain full access to the NVLD. This typically involves removing several plastic rivets and screws.
- Rivets: Be prepared as the rivets securing the fender liner cladding are often one-time use. Have replacement rivets ready. A helpful video on removing these rivets can be found online by searching for “BMW rivet removal”.
- Carefully detach the fender liner: Once rivets and screws are removed, gently detach the fender liner to expose the area behind it.
Step 2: Removing the Old NVLD
With the fender liner removed, you’ll see the NVLD mounted to a bracket.
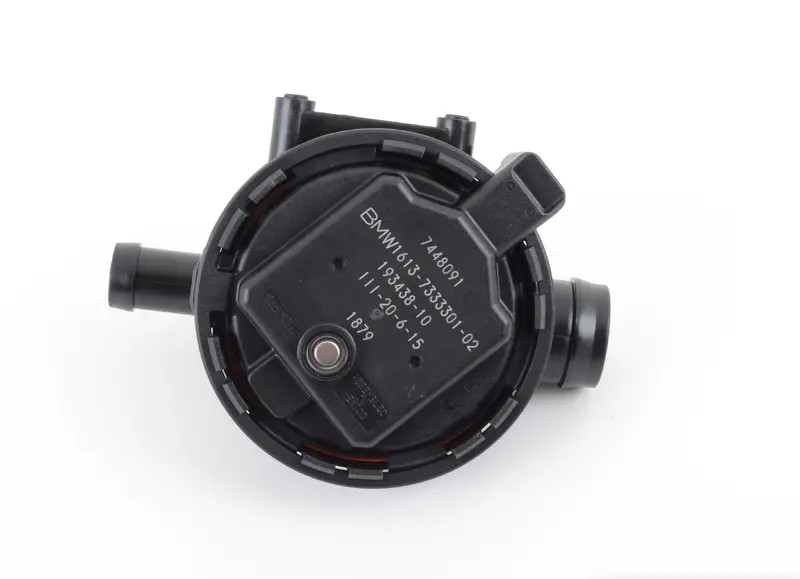
- Identify the NVLD: It will look similar to the part shown in the images.
- Disconnect the electrical connector: This connector can be a bit tricky. Locate a small tab on the connector. You’ll likely need to pull this tab outwards before you can press down on the connector and pull it to disconnect it.
- Unbolt the bracket: The NVLD bracket is secured by two 10mm bolts. Remove these bolts to detach the bracket and NVLD assembly.
- Separate the NVLD from the bracket: Once the bracket is removed, you can detach the NVLD pump itself from the bracket. It’s typically held in place by a couple of T15 Torx screws. Remove these screws.
- Disconnect hoses: Carefully disconnect the dust filter and vent hose from the NVLD. The vent hose clamp is often a one-time use clamp that can be difficult to remove. Online videos demonstrating “one-time use hose clamp removal” can be helpful. Consider replacing this clamp with a standard hose clamp for easier future maintenance.
Step 3: Installing the New NVLD
Installation is essentially the reverse of removal.
- Attach the new NVLD to the bracket: Secure the new NVLD pump to the bracket using the T15 Torx screws.
- Reconnect hoses: Reattach the dust filter and vent hose to the new NVLD. If you removed a one-time use clamp, use a standard hose clamp for the vent hose and tighten it securely.
- Mount the bracket assembly: Reattach the NVLD bracket assembly back to its location using the two 10mm bolts.
- Reconnect the electrical connector: Plug the electrical connector back into the NVLD pump until it clicks into place.
Step 4: Reassembly and Code Clearing
- Reinstall the fender liner: Carefully maneuver the fender liner back into its correct position. This can sometimes require some patience to align it properly with the outer cladding slots.
- Secure the fender liner: Reinstall the rivets and screws to secure the fender liner in place. Use new rivets for the cladding attachments.
- Clear the codes: Use an OBD-II scanner to clear the P0456 code and any other related codes that may have appeared during the process (like P0450, which can temporarily appear after NVLD removal).
After the Replacement: What to Expect
After replacing the NVLD and clearing the codes, the permanent P0456 code should disappear after driving for a short distance, typically around 50 miles, as the system completes its self-tests. Initially, you might see a new temporary code like P0450 (or BMW specific code 194804), which is normal and indicates the system recognized the NVLD was disconnected. This code should also clear itself after driving.
If the P0456 code returns after NVLD replacement, it indicates that the leak may be elsewhere in the EVAP system, requiring further diagnosis by a professional.
Important Note: While this guide details a successful DIY NVLD replacement for a P0456 code on a BMW X3, it’s crucial to remember that proper diagnosis is essential. Always start with the simplest solutions like checking the gas cap. If you’re unsure about any step in this process, consult a qualified automotive technician.
By following these steps, you can potentially resolve a P0456 code on your BMW X3 and ensure your vehicle is ready for emissions testing, all while saving on repair costs by tackling it yourself.