Embarking on an OBD2 to OBD1 conversion for your BMW E36 might seem like diving into the deep end of automotive modification, but for enthusiasts seeking enhanced performance and a more direct engine management system, it’s a worthwhile journey. Often perceived as a straightforward “electronics swap,” the reality is a more intricate process that requires careful planning and execution. This comprehensive guide, drawing upon hands-on experience and detailed research, will walk you through each step of converting your OBD2 E36 to OBD1, ensuring a smoother and more informed transformation.
Why consider this conversion? For many E36 owners, particularly those with OBD2 models, the allure of OBD1 lies in several key advantages. The OBD1 system, while older, offers a simpler and arguably more performance-oriented engine management approach. A primary draw is the compatibility with the M50 intake manifold, known for its superior airflow compared to the OBD2 (M52/S52) manifold. This swap is frequently pursued to unlock hidden horsepower and improve engine responsiveness. Furthermore, the OBD1 system is often favored for its tuning flexibility and the elimination of certain OBD2-era emissions equipment that can be restrictive in performance applications.
Before we delve into the nitty-gritty, let’s gather the essential components required for this transformation. Sourcing the correct parts is crucial for a successful OBD2 to OBD1 conversion. Here’s a detailed list of what you’ll need:
- OBD1 Engine Harness: This is the backbone of the conversion, providing the necessary connections for the OBD1 ECU and sensors.
- OBD1 ECU (413 “Red Label” Preferred): The engine control unit is the brain of the operation. The “red label” 413 ECU is highly sought after as it typically comes from non-EWS (anti-theft system) vehicles, simplifying the process.
- OBD1 Chip: This performance chip, often from aftermarket tuners, is designed to work with the OBD1 ECU and optimize engine parameters for performance gains.
- OBD1 Intake Manifold: The M50 intake manifold is a key component for performance improvement, offering better airflow.
- OBD1 Fuel Rail: Necessary to accommodate the OBD1 fuel pressure regulator and fuel line configuration.
- OBD1 Crank Position Sensor: Different in design and location compared to OBD2, requiring a swap.
- OBD1 Cam Position Sensor: Ensures compatibility with the OBD1 engine management system.
- OBD1 Knock Sensors (x2): OBD1 systems utilize different knock sensors.
- OBD1 Oxygen Sensor: OBD1 systems use a single pre-catalyst oxygen sensor, unlike the multiple sensors in OBD2.
- OBD1 HFM (Hot-Film Air Mass Meter): The air mass meter needs to be OBD1 compatible.
- OBD1 Main Engine Coolant Hose: The coolant hose routing differs between OBD1 and OBD2.
- OBD1 Throttle Boot: Connects the OBD1 HFM to the throttle body, designed for the OBD1 system.
- OBD1 Throttle Body (Optional): While your OBD2 throttle body can be adapted, an OBD1 throttle body simplifies installation.
- OBD1 Valve Cover and Coil Packs (Optional): Choosing between OBD1 or OBD2 valve cover impacts coil pack compatibility and wiring routing.
With the parts assembled, let’s dive into the step-by-step conversion process. Remember, while conceptually straightforward, numerous details demand attention to ensure a successful and reliable OBD2 to OBD1 conversion.
-
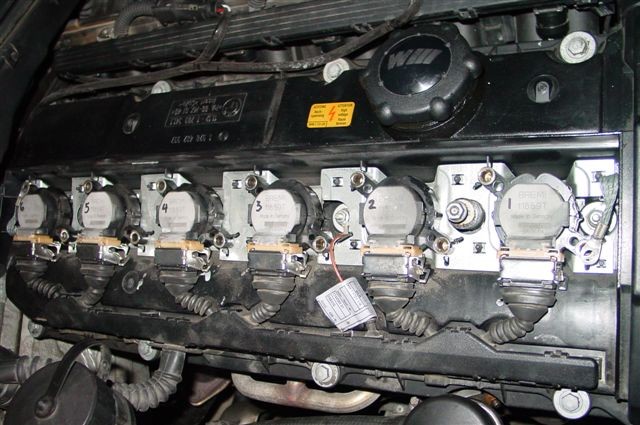
Valve Cover and Coil Packs: The OBD2 valve cover presents a challenge due to its coil pack connector routing. OBD2 coil wiring enters from the passenger side, while OBD1 wiring enters from the driver’s side. You have two main options: retain your OBD2 valve cover or switch to an OBD1 valve cover. Keeping the OBD2 valve cover allows you to use your existing OBD2 coil packs. However, it requires modification to accommodate the OBD1 wiring harness. Alternatively, using an OBD1 valve cover necessitates OBD1 coil packs. Both coil versions are compatible with the OBD1 harness, making this a matter of preference and effort. Many choose to keep the OBD2 valve cover and carefully modify it to route the OBD1 wiring, often using a Dremel tool for precise adjustments.
Here’s a visual of the OBD2 coil setup:
Alt text: Close-up of an OBD2 BMW engine showcasing the coil pack setup and wiring.
And here’s the OBD1 configuration for comparison:
Alt text: Image displaying the OBD1 coil pack arrangement on a BMW engine, highlighting the different wiring entry point compared to OBD2.
-
Vanos Solenoid: The OBD2 Vanos solenoid wire connector is shorter than its OBD1 counterpart. To address this, you can either replace your OBD2 solenoid with an OBD1 solenoid or extend the OBD2 solenoid wiring. A convenient solution for extending the wiring is using BMW part # 12-52-2-274-971, a transmission harness originally intended for connecting the engine harness to the back-up light switch. This part is ideal because its connectors are a direct match for the Vanos solenoid.
Here’s a look at the harness mentioned:
Alt text: Picture of a BMW transmission harness, part number 12-52-2-274-971, used for extending the Vanos solenoid wiring during an OBD2 to OBD1 conversion.
-
Coolant Pipe: A key difference lies in the main coolant pipe from the timing cover. OBD2 models utilize a metal pipe fixed within the timing case cover with sealant, whereas OBD1 models use a rubber hose connected to an aluminum neck protruding from the timing case cover. You have options here: replace the OBD2 timing cover with an OBD1 version, or use a coolant pipe adapter. OBD1 timing covers can be costly. A more economical approach is a coolant pipe adapter, available from various BMW performance parts suppliers like Bimmerworld, Active Autowerkes, or Turner Motorsport. This adapter fits into the OBD2 timing case cover and is secured with JB Weld, allowing you to then clamp the OBD1 coolant hose onto it.
Here’s an image showing the coolant pipe adapter location:
Alt text: Detailed view of a BMW engine bay focusing on the coolant pipe adapter, an aluminum pipe positioned below the oil filter housing, used in OBD2 to OBD1 conversions.
-
Intake Manifold: This is where the performance benefits of the OBD1 conversion truly begin to materialize. The M50 intake manifold’s superior flow characteristics compared to the OBD2 manifold (M52/S52) are well-documented, making it a mandatory component for this conversion. OBD1 manifolds feature an air temperature sensor and a vacuum port for the fuel pressure regulator on the underside, near the firewall. Importantly, the M50 intake manifold is a direct bolt-on to M52/S52 cylinder heads, requiring no modifications for fitment.
-
Throttle Body: You can reuse your OBD2 throttle body, but it necessitates an adapter for the gasket seal. The OBD1 throttle body has a flat mating surface designed to clamp onto a gasket on the OBD1 intake manifold. The OBD2 throttle body is the opposite, featuring a gasket within the throttle body that mates to a flat surface on the OBD2 intake manifold. Solutions include using an adapter plate that sits between the OBD2 throttle body and OBD1 manifold, providing correct mating surfaces for both gasket types. Alternatively, an extended gasket can bridge the gap, allowing direct clamping of the OBD2 throttle body to the OBD1 intake manifold. Of course, opting for an OBD1 throttle body eliminates the need for any adapters.
-
Coolant Temperature Sender: OBD2 systems employ a single coolant temperature sender on the cylinder head, under intake runner #1. OBD1 systems, however, use two senders, located under intake runners #1 and #2. To adapt, you can splice the main engine harness wiring and use the OBD2 plug connector from your old harness to connect to your single OBD2 temp sender. For a cleaner, plug-and-play solution, consider a coolant temperature sender wiring adapter from Turner Motorsport.
-
Crank Position Sensor: The OBD2 crank position sensor is positioned on the engine block, in front of the starter motor. The OBD1 sensor is located on the timing cover, mounted on a circular tab with a 6mm Allen bolt. For the conversion, you must use an OBD1 crank position sensor. Simply leave the OBD2 sensor in place to plug the hole in the block.
-
Fuel Lines: Significant differences exist in the fuel delivery setup between OBD2 and OBD1. The OBD2 fuel rail has both fuel lines connecting at the rear, near the firewall, and the fuel pressure regulator is located near the fuel filter under the car. In contrast, the OBD1 fuel rail has the supply line at the front and the return line at the rear. The OBD1 fuel pressure regulator is integrated into the fuel rail itself. Therefore, using the OBD1 fuel rail is mandatory. This necessitates modifications to your fuel lines. You’ll need to remove the OBD2 fuel pressure regulator from under the car and route new 8mm fuel lines to the OBD1 fuel rail. Bridge the gap left by the removed OBD2 regulator with new fuel line, connecting the feed from the fuel filter to the front of the OBD1 fuel rail and the return line from the back of the fuel rail to the return line under the car. Don’t forget to connect the OBD1 fuel pressure regulator vacuum line to the one-way valve on the underside of the OBD1 intake manifold.
-
PCV (Positive Crankcase Ventilation) System: The OBD2 crankcase vent system differs from OBD1. Several approaches can address this. If retaining the OBD2 valve cover, you can keep the OBD2 PCV setup and devise a way to mount the breather valve (the cone-shaped plastic valve) under the intake manifold. If using an OBD1 valve cover, utilize the OBD1 breather valve, which clips onto the crankcase vent port. The OBD1 valve has a vacuum line connecting to the plug joining the ICV to the intake manifold and a larger oil drain line to the dipstick. A third option is to use a breather catch can. A practical approach, especially when keeping the OBD2 valve cover, is to use a short length of 1” rubber hose to connect the OBD2 valve cover to the OBD1 breather valve, and a barbed connector to join the oil drain line to the dipstick.
Here’s an example of a PCV system hookup:
Alt text: Image depicting a modified PCV system setup in a BMW engine bay, likely showing a combination of OBD1 and OBD2 components during a conversion.
-
Idle Control Valve (ICV): The good news is that the OBD1 and OBD2 ICVs are identical. You can reuse your OBD2 ICV. You will need to acquire the connector and hose for the ICV to intake manifold connection, as well as the hose connecting the ICV to the throttle boot vacuum port.
-
Fuel Tank Breather: Your OBD2 fuel tank breather valve is reusable. You’ll need fittings to connect the vacuum hose to the vacuum port on the throttle boot. Standard hardware store barb fittings, such as 3/8” and 5/8”, can be used to create a suitable connection to the throttle body vacuum port.
-
Oxygen Sensors and Secondary Air Pump: Secondary air pumps are exclusive to OBD2 systems and are eliminated during this conversion. This also means removing the two pre-catalyst and two post-catalyst OBD2 oxygen sensors. Remember to plug the O2 sensor ports; M18 bolts are suitable for this purpose and readily available at auto parts stores (Toyota Land Cruiser oil pan drain bolts are often M18). OBD1 management only uses a single pre-catalyst oxygen sensor.
-
Oil Pan & Dipstick: Contrary to some misconceptions, an OBD1 oil pan and dipstick are not necessary for this conversion. Your OBD2 oil pan and dipstick can be used without any issues or modifications.
-
EWS (Immobilizer): EWS presence varies across E36 models. While using a non-EWS ECU simplifies things, ignition issues can still arise post-conversion. A straightforward modification to the main engine harness can preemptively address EWS concerns. Locate wire #66 (usually solid green or black/violet) on the ECU connector, remove the protective rubber boot, cut wire #66, and insulate both ends with electrical tape.
-
Power Distribution & Grounding: Before disconnecting anything, meticulously document or label power and ground connections. Crucially, all electrical work should be performed with the negative battery terminal disconnected. The OBD2 main battery positive post is near the ECU compartment on the passenger side. The OBD2 distribution box is mounted parallel to the fender. You’ll need to slightly relocate this distribution box to access the power connections on the OBD1 harness. Removing the secondary air pump creates space and screw holes to remount the distribution box closer to the engine and parallel to the firewall. Ensure you correctly identify power feeds (RED wires) and grounds (BROWN or BLACK wires). Double-check by peeling back wiring sheathing if unsure. There will be a ground connection under the OBD diagnostics port, a large power feed to the starter, and a smaller power feed to the fuse box. Another ground is a small wire from the spark plug rail, which should be grounded to the bolt securing the engine hoist loop on the Vanos unit.
Here’s an image of the relocated power terminal:
Alt text: Image showing a relocated power terminal box in a BMW E36 engine bay, a modification done to accommodate the OBD1 harness during an OBD2 to OBD1 conversion.
-
General Wiring: Labeling connectors before attempting harness installation is paramount. Use Bentley wiring schematics and methodically identify and label each connector with painter’s tape and a marker. This is essential as the harness can become a confusing tangle of similar-looking connectors once in the engine bay. Fortunately, wire lengths are generally well-suited, and connectors are typically located near their corresponding components. Taking photos of OBD2 power and ground connections during disassembly is highly recommended, especially starter wiring connections.
Here’s a view of a labeled OBD1 harness:
Alt text: Photograph of a BMW OBD1 engine wiring harness meticulously labeled with tape, prepared for installation during an OBD2 to OBD1 conversion.
Final Configuration and Dyno Results:
The author’s final configuration after the OBD1 conversion included:
- 1999 M3 OBD1 S52
- Active Autowerkes (AA) Cam Chip
- Sunbelt Cams
- Euro 3.5″ HFM
- Conforti 3.5″ Intake
- 24lb Injectors
- Sunbelt Valve Springs
- ARP Headstuds
- AA Race Headers
- AA Race Exhaust
- Zionsville Competition Radiator
- Euro Oil Cooler
Here’s the final appearance of the OBD1 S52 engine:
Alt text: Image showcasing the completed OBD1 S52 engine conversion in a BMW E36 M3, highlighting the clean and functional setup.
Initial dyno results showed 253 rear-wheel horsepower (RWHP) and 228 lb-ft of torque. After revisions to the chip tuning by Active Autowerkes to lean out the air-fuel ratio, subsequent dyno runs yielded 262 RWHP and 230 lb-ft of torque, demonstrating a noticeable performance improvement from the OBD1 conversion and supporting modifications.
Conclusion:
The OBD2 to OBD1 conversion for your E36 BMW, while demanding, offers a pathway to enhanced engine performance and tuning flexibility. By meticulously following these steps, sourcing the correct components, and paying close attention to detail, you can successfully unlock the hidden potential of your BMW. Remember to double-check wiring, properly label connections, and take your time throughout the process. This conversion is a significant undertaking, but the rewards in terms of driving experience and engine responsiveness can be substantial for the dedicated BMW enthusiast. If you encounter challenges or have further questions, consulting online BMW forums and communities can provide invaluable support and shared knowledge.