As a disc golf enthusiast, you’ve likely encountered the dreaded OB. Navigating out of bounds (OB) is a crucial aspect of disc golf, impacting your score and strategic play. Understanding the rules surrounding OB, as defined by the Professional Disc Golf Association (PDGA), can significantly improve your game and prevent penalty strokes. This guide, crafted by an automotive repair expert turned passionate disc golf content creator at obd-de.com, will delve into the intricacies of disc Golf Ob rules, ensuring you’re well-versed in this essential aspect of the sport.
This article is based on the most current Official Rules of Disc Golf and Competition Manual from the PDGA, effective January 1, 2025. We’ll primarily focus on rule 806.02 of the Official Rules of Disc Golf, a resource readily available in the More tab of the UDisc app.
What Does Out of Bounds (OB) Mean in Disc Golf?
In disc golf, out of bounds (OB) designates areas that are not part of the playing surface of a hole. Landing your disc in an OB area results in a penalty of one stroke.
For instance, if your initial throw goes OB, you’ll incur a penalty stroke, and your subsequent throw will be considered your third shot. There’s no limit to OB penalties on a single hole; each throw landing OB adds another penalty stroke to your score.
Why is OB Important in Disc Golf?
OB serves several key purposes in disc golf course design and gameplay:
- Safety: OB lines often demarcate areas where errant discs could pose a risk to others, such as fairways of adjacent holes or public areas.
- Course Management and Difficulty: OB adds strategic complexity and challenge to holes. It discourages risky throws into areas with potential for lost discs or slow play due to extensive searches in dense rough or difficult terrain.
- Defining Fair Play Areas: OB helps define the intended playing area of a hole, encouraging players to navigate specific routes and challenges designed by the course architect.
Identifying OB Areas on a Disc Golf Course
In competitive disc golf, tournament directors are responsible for clearly outlining OB areas in player information materials. Always review these materials and clarify any ambiguities with the tournament director before play begins.
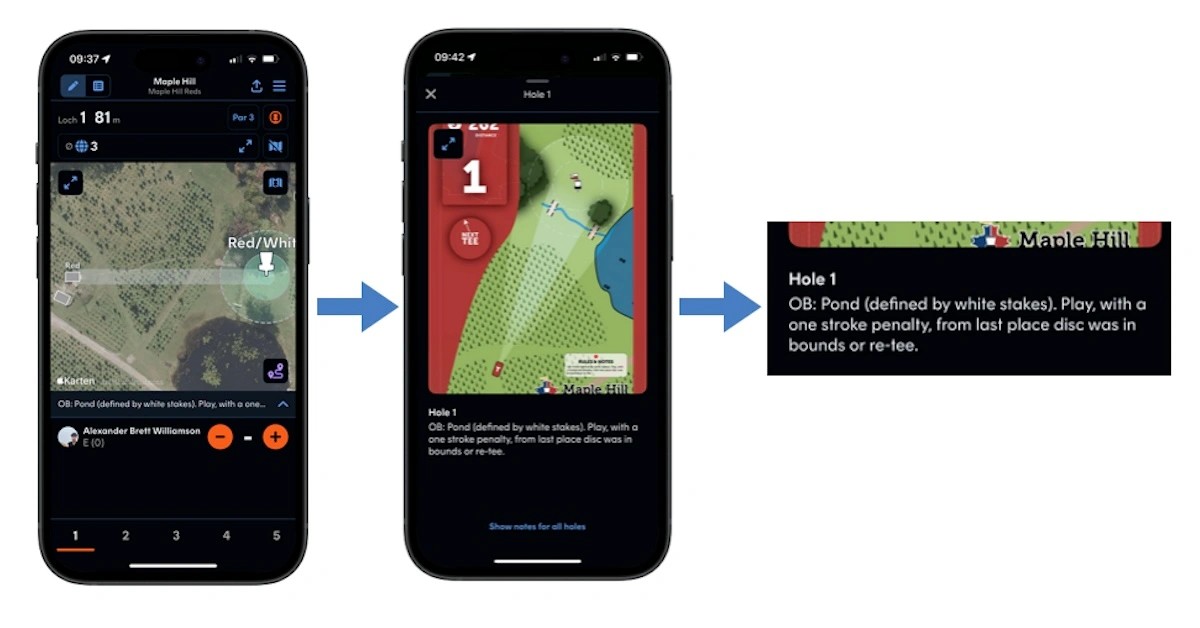
For casual rounds, tee signs are your primary source of OB information. UDisc, a popular disc golf scoring app, often includes hole-specific rules and tee sign images, thanks to Course Ambassadors who voluntarily update course information. This information can be found under the interactive course map on your scorecard in the UDisc app.
If tee signs or UDisc lack OB information, local disc golfers are invaluable resources. When playing a new course, always ask locals about OB rules before starting your round.
Determining If Your Disc is OB: The Essentials
A disc is considered OB only if the entirety of the disc is situated within the OB area. If any part of the disc, even a minimal edge, is touching or hovering over in-bounds territory, the disc is deemed to be in bounds.
Common OB areas on disc golf courses frequently include:
- Paths: Paved or unpaved walking paths, cart paths, or roads are often designated as OB.
- Water Hazards: Bodies of water such as lakes, ponds, rivers, and creeks are typically OB.
- Fenced Areas: Areas beyond fences, including athletic fields or private property, are often marked as OB to prevent trespassing and ensure safety.
Markers like stakes, flags, painted lines, or ropes are frequently used to delineate OB boundaries. Let’s examine common OB scenarios in detail:
OB Paths and Paved Surfaces
In the image above, the brick path is designated as OB, while the grass is in bounds.
The disc on the left is considered in bounds because a portion of its edge extends over the in-bounds grass. Crucially, a disc doesn’t need to physically touch the in-bounds surface; merely overhanging it is sufficient to be in bounds.
Conversely, the disc on the right is OB as the entire disc rests within the OB path area.
Determining the OB line on dirt, gravel, or eroded paths can be subjective. In casual play, use your best judgment. In tournaments, your group collectively decides. Remember, PDGA rules stipulate that a disc must be “clearly and completely surrounded by an out-of-bounds area” (806.02.B) to incur a penalty. If uncertainty prevails, it’s generally better to err on the side of caution and consider the disc in bounds.
Continuously Marked OB Lines (Ropes, Painted Lines)
In these images, the area from the red rope to the left is OB.
The disc on the left is in bounds as a part of it extends into the in-bounds area.
The middle disc is clearly OB, being entirely within the OB area.
The disc on the right presents a common point of confusion for new players. It’s vital to understand that the entire OB line itself is considered part of the OB area, regardless of its thickness (rope, paint, etc.). Therefore, a disc touching or overhanging the OB line, without any part extending beyond the line into in-bounds, is ruled OB.
Non-Continuous OB Markers (Stakes, Flags)
Stakes delineate the OB line in these examples. The area above the stakes is OB; the area below is in bounds. When OB is marked by non-continuous objects like stakes or flags, players must visualize an imaginary line connecting the closest markers to determine the OB boundary. This imaginary line is illustrated in blue above.
The stakes themselves are part of the OB line. For a disc to be in bounds, some portion must be completely past this imaginary line. The imaginary line originates from the in-bounds edge of the stakes, not the center or back. This principle applies to any objects used to mark OB in this manner, unless tournament-specific rules dictate otherwise.
As demonstrated, the top disc is in bounds due to a portion residing in the in-bounds area.
The bottom disc is OB because the entire disc is beyond the visualized OB line.
Water as Out-of-Bounds
Here, the water’s edge, where it meets continuous dry land, constitutes the OB line.
The disc on the left is in bounds because it overhangs the area beyond the water line.
Despite its edge being out of the water, the disc on the right is OB. It is entirely surrounded by water and no part touches or overhangs the land preceding the water line.
The “water line” refers to the outer edge of the water feature where it meets the fairway or other in-bounds area.
Remember, dry ground doesn’t automatically equate to in bounds. Similar to other OB areas, your disc must touch or overhang a point beyond the defined OB area to be considered in bounds.
Submerged discs are not automatically OB. “Casual water,” such as puddles from rain or small creeks, is not considered OB. You can play from casual water without penalty. Refer to our article on disc golf relief rules for more information.
Playing After Going OB: Basic Procedure
The standard procedure after going OB in disc golf is to resume play from an in-bounds location within one meter (3.28 feet) of the point where your disc last crossed into OB. You can even move closer to the basket within this one-meter relief area.
The blue shaded area in the image illustrates the permissible relief zone. You can choose any spot within this area to take your next throw.
Crucially, no part of your body can be in contact with the OB area when you release your throw. This is a primary reason for the relief rule.
Since meter sticks are uncommon on the course, disc golfers typically use three heel-to-toe steps to approximate one meter.
More advanced OB relief options exist, which we’ll explore in the next section.
Playing After Going OB: Advanced Relief Options
Less commonly known OB relief rules, found in PDGA rule 803.02 (sections D and E) concerning relief, offer additional options.
These rules allow you to move backward along the “line of play” without further penalty. The line of play is an imaginary straight line extending from the basket (or target) to any point within your one-meter relief area.
Why move further from the basket? Moving backward along the line of play can help you avoid obstacles present at the initial OB entry point. For example, if you went OB under a tree, moving back could provide a clearer throwing lane.
In the illustration, the line of play passes through the OB entry point for simplicity. However, it can extend from the basket to any in-bounds point within your one-meter relief area. Moving backward along this line allows a better angle around the tree without additional penalty beyond the initial OB stroke.
Another example:
Key takeaways from the image:
- Lines of play can traverse OB areas, even though you cannot play from OB.
- If OB areas are finite, you can take optional relief behind them in in-bounds territory along a valid line of play.
However, optional relief is limited when the line of play intersects with infinitely extending OB.
In this scenario, optional relief is restricted due to the angle to the basket from the OB entry point. You cannot move parallel to the OB line; relief is only permitted along a valid line of play.
You can utilize similar relief options at any point in your round. However, taking relief without first going OB (or violating the two-meter rule, if applicable) incurs a one-stroke penalty. See our comprehensive article on disc golf relief rules for further details.
Playing After Going OB: Special Cases
Beyond the standard procedures, specific situations warrant unique OB rules.
Island Holes
Island holes feature a designated in-bounds area, typically surrounding the basket. Landing outside this island is OB.
Island holes often employ “drop zones” – specific areas where players whose discs fail to land on the island must take their next shot. Whether your disc lands OB directly or crosses in bounds then rolls OB, you proceed to the drop zone.
Drop zones can be marked lines, ground markers, alternate tees, or other designated areas.
Missing the island incurs a one-stroke penalty. Players typically continue throwing from the drop zone until they land in bounds.
If an island hole lacks a drop zone, players must re-tee, adding the OB penalty stroke to their score.
PDGA rules don’t explicitly govern island holes, so rules can vary. In casual play, consult tee signs or local players. In tournaments, refer to the caddie book or tournament director for clarification. Drop zones may also be used on non-island holes, so always check for specific hole instructions.
Hazards
Courses sometimes designate areas as hazards instead of OB. Landing in a hazard incurs a penalty stroke, similar to OB, but you play your next shot from where the disc lies within the hazard. No relief is granted from hazards, and you cannot move back along the line of play without an additional penalty stroke.
Hazards are common on disc golf courses integrated into ball golf courses, where sand traps are often designated as hazards. Hazard rules are outlined in PDGA rule 806.05.
Tournament Director Option: Rule 806.02.D.4
Rule 806.02.D.4 offers a rarely used option for tournament directors:
At the Director’s discretion, the player may additionally choose to play the next throw from a lie designated by a marker disc placed on the playing surface up to one meter away from the point on the out-of-bounds line nearest the position of the disc.
This allows a TD to permit players to choose between playing from the standard OB relief point or from a point within one meter of where the disc lies in the OB area.
This rule is infrequently implemented.
OB Before Missing a Mandatory (Mando)
If your disc goes OB before missing a mandatory (mando), mando rules take precedence. Continue play according to mando rules, even if OB was encountered first.
PDGA rule 804.01.C states that missing a mando results in a penalty stroke and requires proceeding to the designated drop zone (or previous lie if no drop zone exists). There are no exceptions for OB encounters prior to missing the mando. Mando rules supersede OB rules in this scenario.
For a deeper understanding of mandatories, consult our article on disc golf mandatory rules.
Landing In Bounds, Taking Relief from OB
Even if your disc lands in bounds, you can take one meter of relief from OB if your lie is within one meter of the OB line, as throwing with a supporting point in OB is illegal.
However, relief direction is restricted in this situation. You have two options:
- Perpendicular Relief: In most cases, relief is taken along a one-meter line perpendicular to the OB line.
- Corner Relief: If you land within one meter of an OB corner, relief can be taken along a one-meter line extending from the corner through your disc.
These rules are detailed in PDGA rule 806.02.E.
OB Determinations: Who Decides?
In tournaments, OB calls are determined in three ways:
- Group Consensus: Majority agreement within your group.
- Thrower’s Call: The thrower can declare their disc OB, unless a majority of the group disagrees.
- Tournament Official: A TD or assistant TD can make official OB rulings, typically without needing group confirmation. An exception occurs when an official competes in the same division; in this case, their ruling requires group confirmation unless they are part of the player’s group, in which case their vote is weighted the same as any other player in the group.
These rules are found in PDGA rule 801.02.E, G, and I.
Finding Your Disc and Calling OB
PDGA rules, updated in 2025, clarify that physically finding your disc isn’t mandatory to call OB. “Compelling evidence” of the disc landing OB is sufficient (rule 806.02.C). This distinction is crucial as OB and “lost disc” rules differ (see rule 805.03 for lost disc rules).
Just as a group can agree a disc is in a lake without visual confirmation, they can agree a disc is OB in dense brush or tall grass based on compelling evidence without physically seeing it.
Resolving OB Disagreements
If a group is evenly split on an OB call, PDGA rule 801.02.J dictates that “the ruling is based on the interpretation that is most beneficial to the thrower,” typically meaning the disc is considered not OB. This also applies to disagreements about the last in-bounds point.
However, players must make a call based on their interpretation of evidence, not default to the beneficial ruling due to doubt. The “most beneficial” rule only applies to genuine deadlocks, not when players avoid making a definitive call.
In rare situations where OB is unclear due to ambiguous markings or caddie book vagueness, and the disc is visible, follow these steps for efficient play:
- Capture photo or video evidence of the disc’s location, including relevant context.
- If possible, immediately send evidence to a tournament official, clearly explaining the ambiguity and seeking clarification (e.g., “Are flags or painted lines defining OB here?”). A prompt response may resolve the issue.
- If contacting an official isn’t feasible or timely, play the hole provisionally, proceeding as both in bounds and OB. Clearly announce your intention to play provisional throws before throwing. Play out both scenarios, keeping separate scores. Do not finalize your scorecard until the correct score is determined. Provisional throws are governed by rule 809.02. Once declared, you must complete both scenarios fully.
- After the round, use the photo/video evidence to obtain official clarification and adjust your scorecard accordingly. PDGA Competition Manual rule 1.12.H.1 now permits photo and video evidence for OB rulings (since 2025).
Further Disc Golf Rules Inquiries?
We hope this comprehensive guide clarifies disc golf OB rules. If you have further rules topics you’d like us to cover, please email your suggestions to [email protected]. We value your feedback and aim to continue expanding this helpful rules series.