Installing an OBD2 tracker in your vehicle is a straightforward process, often achievable without professional help. These plug-and-play devices are designed for easy self-installation, providing a convenient way to monitor your vehicle. This guide will walk you through the simple steps to install your OBD2 tracker, ensuring a smooth and successful setup.
Before you proceed with the installation, it’s important to understand a few key points to ensure proper functionality and avoid any potential issues. Please read the following guidelines carefully before installing your device.
RAM Tracking shall have no liability whatsoever for any damages that arise from, or are connected with, your use of our services, including the vehicle tracker, in a manner contrary to these instructions or in violation of law and/or our agreement.
Pre-Installation Checklist
Before physically installing your OBD2 tracker, take a moment to prepare and ensure a smooth process. Here’s a quick checklist:
- Vehicle Compatibility: Verify that your vehicle is compatible with an OBD2 tracker. This is especially important if you are moving the tracker between vehicles. Generally, most modern vehicles manufactured after 1996 are OBD2 compliant. For detailed compatibility information, refer to your device’s documentation or the manufacturer’s website.
- Optimal GPS Location: Position your vehicle in an open area with a clear view of the sky. This ensures strong GPS signal reception, crucial for the tracker to function correctly. Avoid installing in enclosed spaces like garages initially.
- Engine Off: Ensure your vehicle’s engine is completely switched off before you begin the installation. This is a safety precaution and helps prevent any electrical issues during the process.
- Download the App: If your OBD2 tracker requires a companion app for monitoring and data access, download and install it on your smartphone or device beforehand. This will save time and allow you to immediately test the tracker once installed.
Step-by-Step OBD2 Tracker Installation Guide
Now, let’s get to the installation itself. Follow these simple steps to quickly set up your OBD2 tracker:
-
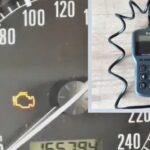
Locate the OBD2 Port: The first step is to find your vehicle’s OBD2 port. This port, also known as the diagnostic port, is a standardized connector used for vehicle diagnostics. It’s typically located inside the cabin of your vehicle, but its exact location can vary. Common places to check are:
- Under the dashboard on the driver’s side
- Beneath the steering wheel column
- Around the glove compartment area
- In the center console
If you are unsure, consult your vehicle’s owner’s manual for the precise location of the OBD2 port.
-
Plug in the OBD2 Tracker: Once you’ve located the OBD2 port, take your OBD2 tracker and carefully plug it directly into the port. It should fit snugly but without excessive force. Ensure it is securely connected.
-
Start the Engine and Idle: After plugging in the device, start your vehicle’s engine. Let the engine idle (run without driving) for about 5 minutes. This step is crucial as it allows the OBD2 tracker to power up, initialize, and acquire a GPS signal.
-
Verify Connection and Signal: With the engine idling and the tracker installed, check your tracking app (if applicable) or the device indicators to confirm it is receiving a GPS signal and transmitting data. Typically, within a few minutes, you should see your vehicle’s location appear on the map in your tracking app. If you encounter any issues during this stage, consult the troubleshooting section or contact support for assistance.
Troubleshooting and Support
If you experience difficulties during the installation or if your OBD2 tracker is not functioning as expected, here are a few quick checks:
- Check Port Connection: Ensure the OBD2 tracker is firmly and correctly plugged into the OBD2 port. A loose connection can prevent proper operation.
- Vehicle Compatibility: Double-check your vehicle’s compatibility with the OBD2 tracker. Refer to the device specifications or manufacturer’s compatibility list.
- GPS Signal Strength: Make sure your vehicle is in an area with good GPS coverage. Move to a more open location if necessary and allow a few more minutes for the device to acquire a signal.
- Device Indicators: Observe any LED indicators on the OBD2 tracker itself. These lights often provide information about power, GPS signal, and network connectivity. Refer to your device manual for indicator meanings.
If these steps don’t resolve the issue, or if you require further assistance, it’s recommended to Contact Support for dedicated help.
Installing an OBD2 tracker is generally a user-friendly process. By following these instructions, you can quickly and easily set up your device and start monitoring your vehicle.