An ignition coil is a vital component of your vehicle’s ignition system, responsible for providing the high-voltage spark needed to ignite the air-fuel mixture in the engine cylinders. If you suspect problems with your car’s performance, such as misfires or difficulty starting, testing your ignition coil is a crucial step in diagnosing the issue. This guide will walk you through the process of testing an ignition coil using a multimeter, ensuring you can confidently identify whether your coil is functioning correctly.
Understanding the Ignition Coil and Its Importance
Before diving into the testing procedure, it’s important to understand the basics of an ignition coil. An ignition coil is essentially a transformer that steps up the relatively low voltage from your car’s battery (typically 12 volts) to the thousands of volts needed to create a spark at the spark plug. This high-voltage spark is what ignites the fuel and air mixture, creating combustion and powering your engine.
An ignition coil consists of two main windings:
- Primary Winding: This is the low-voltage side of the coil, connected to the vehicle’s electrical system.
- Secondary Winding: This is the high-voltage side, connected to the spark plug.
Testing an ignition coil involves measuring the resistance across these windings to check for internal shorts, opens, or other issues that could prevent it from functioning correctly.
Tools You’ll Need for Testing
To test an ignition coil, you will need the following tools:
- Multimeter: A digital multimeter is recommended for accurate readings.
- Manufacturer’s Specifications: Ideally, have the resistance specifications for your specific ignition coil. This information can usually be found in your vehicle’s repair manual or online. If unavailable, general guidelines can be used.
Step-by-Step Guide to Testing the Primary Coil
The primary coil test checks the low-voltage winding of the ignition coil. Here’s how to do it:
- Set Your Multimeter: Turn on your multimeter and set it to measure resistance (Ohms – Ω). Select the lowest range setting available, typically in the 200Ω range.
- Locate the Primary Terminals: Identify the primary terminals on your ignition coil. These are usually the terminals that connect to the thinner wires. On older coils, these might be labeled with (+) and (-) or specific terminal markings. For many modern coils, these are the pins on the electrical connector.
- Connect the Multimeter Leads: Connect the black lead of your multimeter to one primary terminal and the red lead to the other primary terminal. It doesn’t matter which lead goes to which terminal for resistance testing.
- Read the Resistance Value: Observe the reading on your multimeter. Compare this reading to the manufacturer’s specifications. A typical primary coil resistance is often in the range of 0.5 to 5 ohms, but this can vary.
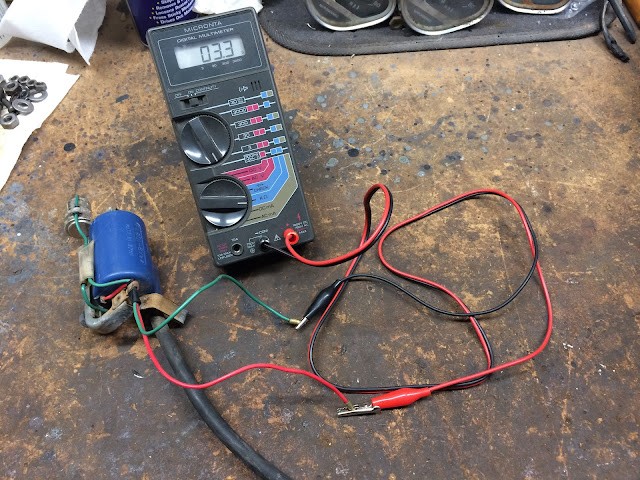
In this image, a multimeter is connected to the primary terminals of an ignition coil to measure resistance, demonstrating the primary coil test setup.
Step-by-Step Guide to Testing the Secondary Coil
The secondary coil test checks the high-voltage winding, which is responsible for generating the spark.
- Set Your Multimeter: Change your multimeter setting to a higher resistance range, typically in the kilo-ohms (kΩ) or mega-ohms (MΩ) range. A 20kΩ or 200kΩ setting is often appropriate.
- Locate the Secondary Terminals: Identify the secondary terminals. One secondary terminal is typically one of the primary terminals you used in the previous test. The other secondary terminal is the high-voltage output, where the spark plug wire connects (or the terminal inside the spark plug boot on coil-on-plug systems).
- Connect the Multimeter Leads: Connect one multimeter lead to a primary terminal (it doesn’t matter which one for this test). Connect the other multimeter lead to the secondary terminal (the spark plug wire connection point). If testing a coil-on-plug unit, you may need to insert the lead into the spark plug boot to make contact with the terminal. Remove the spark plug cap if it has a resistor to avoid influencing the reading.
- Read the Resistance Value: Observe the resistance reading. Compare this reading to the manufacturer’s specifications. Secondary coil resistance is typically much higher than primary resistance, often ranging from 3kΩ to 30kΩ or more, depending on the coil type.
This image illustrates testing the secondary coil of an ignition coil using a multimeter, with leads connected to the primary and secondary terminals.
Interpreting Your Ignition Coil Test Results
Once you have performed both primary and secondary coil tests, you need to interpret the readings:
- Readings within Specification: If both primary and secondary resistance readings are within the manufacturer’s specified range, the ignition coil is likely functioning correctly. However, resistance testing only checks the coil windings. There could still be issues under high voltage or load. Further testing might be necessary if problems persist.
- Open Circuit (Infinite Resistance or “OL” on Digital Multimeter): An extremely high or infinite resistance reading (often displayed as “OL” or “1” on a digital multimeter) indicates an open circuit within the coil winding. This means there is a break in the wire, and the coil will not function. The ignition coil needs to be replaced.
- Low or No Resistance (Short Circuit): A very low resistance reading, significantly lower than specified, indicates a short circuit within the coil windings. This means the wires are touching each other, bypassing some windings and reducing resistance. The ignition coil likely needs replacement.
- Resistance Slightly Out of Spec: A reading slightly outside the specified range might still indicate a functional coil, especially on older vehicles. However, significantly out-of-spec readings suggest potential problems and warrant further investigation or replacement, especially if experiencing ignition issues. In the original article’s example, a slightly higher primary resistance was noted on an older coil but deemed acceptable.
Additional Tips for Ignition Coil Testing
- Check Connections: Before concluding a coil is bad, ensure all electrical connections to the coil are clean and tight. Corrosion or loose connections can cause ignition problems.
- Inspect for Physical Damage: Visually inspect the ignition coil for cracks, leaks, or other physical damage. Damage can indicate internal problems.
- Test the Spark Plug Cap: As mentioned in the original article, check the spark plug cap resistance separately, especially if it’s a resistor type. A faulty spark plug cap can also cause ignition issues.
- Consider Other Ignition Components: If the ignition coil tests within specification but ignition problems persist, investigate other components of the ignition system, such as spark plugs, wires, distributor (if applicable), crankshaft/camshaft position sensors, and the ECU.
By following these steps, you can effectively test your ignition coil and gain valuable insights into your vehicle’s ignition system health. Remember to consult your vehicle’s repair manual for specific resistance values and always prioritize safety when working with automotive electrical systems.