For Tesla Model 3 owners looking to access vehicle diagnostics or utilize third-party apps for performance monitoring, understanding the location and accessing the Model 3 Obd2 Port is essential. Unlike traditional vehicles, the Tesla Model 3’s diagnostic port is not immediately apparent and requires a few steps to access. This guide will walk you through the process of locating and exposing the diagnostic connector in your Model 3, allowing you to connect compatible OBD2 devices.
Before you begin, it’s critical to understand that accessing the diagnostic port involves working with your vehicle’s sensitive electronics. Therefore, safety and proper procedure are paramount.
Before You Start!
Crucially, the Tesla Model 3 MUST be completely powered down before you plug any cable into the diagnostic connector. This shutdown process is not instantaneous and requires approximately 15 minutes to fully complete. You must initiate this shutdown via the main touchscreen interface within your Tesla.
Failing to properly shut down your vehicle before inserting any diagnostic cable can lead to potential damage to your car’s systems and may trigger error messages. Always prioritize this step to avoid any complications.
Location of the Diagnostic Connector in the Model 3:
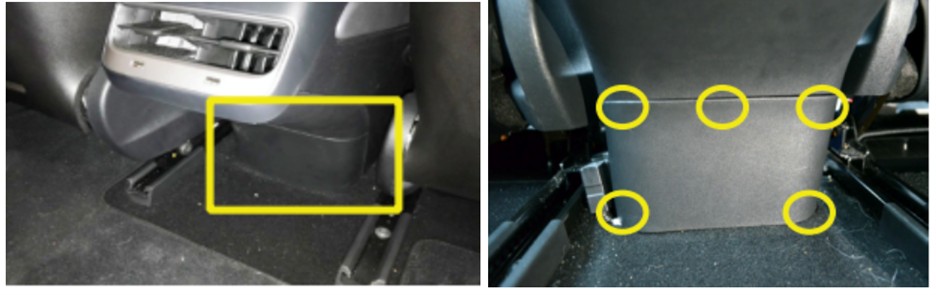
The model 3 obd2 port, or more accurately, the Tesla diagnostic connector, is strategically placed at the rear of the center console. Specifically, it’s situated beneath the rear air vents and is accessible from the rear passenger legroom. Reaching this connector necessitates the removal of the rear center console cover.
How to Get to the Diagnostic Connector?
Follow these step-by-step instructions to safely access the diagnostic connector in your Tesla Model 3:
Step 1: Begin by maximizing your workspace. Slide both the driver and front passenger seats all the way forward to provide ample room to work in the back seat area.
Step 2: Move to the back seat of your Model 3. Locate the small plastic panel situated at the base of the center console, positioned between the two front seats. This panel is held securely in place by five push-fit clips. These clips are designed to release when firm, directed pressure is applied, allowing the panel to be carefully opened and removed by hand.
Step 3: For the initial clip release, you can utilize a tool like an Allen wrench or an L-shaped screwdriver. Take the tool and slide the short end underneath the plastic panel on the right side.
Step 4: Rotate the tool so that the short end is now in a vertical orientation. Gently pull the tool towards you, keeping your movement parallel to the floor of the car. This action should loosen the bottom right clip that secures the panel.
Step 5: Now, using your hands, carefully pull the panel towards you. This will help to loosen the clip located at the top right of the panel.
Step 6: Continue working your way around the panel, loosening and opening the remaining three clips. Once all clips are disengaged, you can fully remove the plastic panel, exposing the diagnostic connector.
Step 7: With the panel removed, you will now see the Tesla Proprietary Diagnostic Connector. It typically features a white connector.
Step 8: To detach the white connector from its housing, locate the clip that secures it. Press the clip and slide the connector to the left to release it from its fixed position.
Step 9: Take your Tesla diagnostic cable and plug the two white ends of the cable into the corresponding connectors within the vehicle. Ensure they are correctly aligned and push until you hear a click, indicating a secure connection. The connectors are designed to fit only in one orientation, preventing incorrect connections.
Step 10: Finally, connect your OBDLink dongle (or your chosen OBD2 adapter) to the diagnostic cable. You can then establish a connection between the OBDLink dongle and your smartphone or tablet, typically via Bluetooth, to utilize your preferred OBD2 applications like Scan My Tesla or TM-Spy.
Important Note: Connecting any equipment to your Tesla vehicle for diagnostic purposes is undertaken entirely at your own risk. Neither Carvitas nor obd-de.com assumes any responsibility for any damage to your vehicle that may arise from the improper use of this product or procedure. It is the user’s responsibility to thoroughly inspect the diagnostic cable for any signs of damage both upon receipt and before each subsequent use. The cable provided is designed as an adapter to facilitate the reading of data from your car’s system. It utilizes the vehicle’s CAN High and Low signals and also provides power to the OBD dongle.