For auto repair professionals and enthusiasts alike, the On-Board Diagnostics II (OBD2) system has become an indispensable tool. While many are familiar with basic scan tools and code reading, a deeper understanding of OBD2 parameters can significantly enhance diagnostic capabilities. Among these powerful parameters, Obd2 Fuel Trim stands out as a critical indicator of engine health and a key to pinpointing a wide range of driveability issues. This article delves into the world of fuel trim, explaining how to use this data to effectively diagnose engine problems and optimize your repair process.
Understanding OBD2 Fuel Trim: Short Term and Long Term
At its core, OBD2 fuel trim reflects the adjustments the engine control unit (ECU) makes to maintain the optimal air-fuel ratio of 14.7:1 (stoichiometric) for gasoline engines. This ratio is crucial for efficient combustion, emission control, and overall engine performance. Fuel trim is expressed as a percentage and is categorized into two main types:
-
Short-Term Fuel Trim (STFT): This is a dynamic, real-time adjustment that the ECU makes in response to immediate changes in sensor readings, primarily from the oxygen sensors. STFT values fluctuate rapidly as the ECU constantly fine-tunes the fuel delivery to maintain the ideal air-fuel ratio under varying driving conditions.
-
Long-Term Fuel Trim (LTFT): LTFT represents learned corrections that the ECU stores over time. It’s a more stable value that compensates for consistent deviations in the air-fuel ratio indicated by STFT. Think of LTFT as the ECU’s way of making permanent adjustments for long-term trends, such as a slightly dirty mass airflow (MAF) sensor or minor vacuum leaks.
Positive fuel trim values indicate that the ECU is adding fuel to compensate for a lean condition (too much air, not enough fuel). Conversely, negative values mean the ECU is subtracting fuel to correct a rich condition (too much fuel, not enough air).
The 4-Step OBD2 Fuel Trim Diagnostic Process
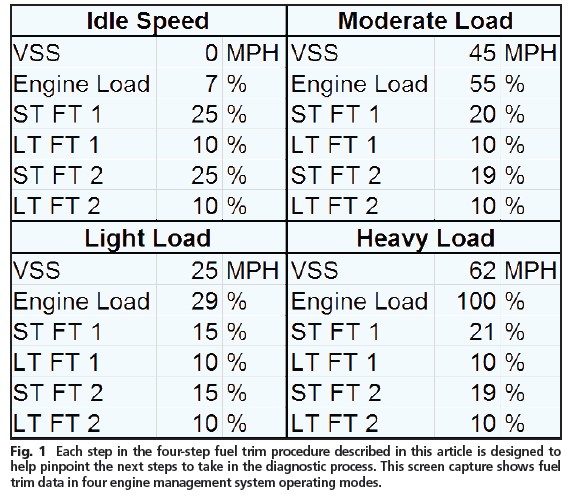
Baselining fuel trim data is a straightforward yet powerful four-step diagnostic process that can significantly narrow down potential problem areas. By monitoring fuel trim across different engine loads, you can gain valuable insights into the nature of the issue.
-
Connect Your OBD2 Scan Tool: Begin by connecting a quality OBD2 scan tool to your vehicle. For comprehensive diagnostics, a scan tool with recording capabilities is highly recommended, allowing you to capture and analyze fuel trim data over time and across different driving conditions.
-
Monitor and Record Fuel Trim Data Across Operating Ranges: This is the core of the process. Record both STFT and LTFT values in the following four common operating ranges:
- Idle Speed: Engine idling in park or neutral.
- Light Load (20-30 mph): Gentle acceleration and cruising at a low speed.
- Moderate Load (40-50 mph): Normal driving conditions on city streets or highways.
- Heavy Load (60-70 mph): Highway speeds and moderate acceleration.
-
Analyze the Collected Data: Once you have recorded fuel trim data across these ranges, carefully analyze the patterns. Pay attention to whether the fuel trim values are positive or negative, and how they change across different engine loads. Consistent patterns are key indicators.
-
Target Your Diagnostic Steps: Based on your fuel trim analysis, you can strategically target your next diagnostic steps. The fuel trim data will help you prioritize which components or systems are most likely contributing to the issue, saving you time and effort in your diagnostic process.
Case Study 1: Diagnosing Lean Codes (P0171 & P0174) with OBD2 Fuel Trim
Let’s consider a vehicle exhibiting a Check Engine Light and setting codes P0171 (Bank 1 System Lean) and P0174 (Bank 2 System Lean). Traditional troubleshooting might suggest a range of potential culprits, from a clogged fuel filter to vacuum leaks. However, OBD2 fuel trim data can quickly refine your diagnostic approach.
Figure 1 illustrates fuel trim data collected from such a vehicle. Notice that both banks show significantly positive fuel trim values across all operating ranges – idle, light load, moderate load, and heavy load. This pattern is crucial. Lean codes indicate the engine is running with too much air or too little fuel. The consistently high positive fuel trim across all ranges suggests a systemic issue affecting the entire engine, rather than a localized problem like a single leaking injector.
Considering the components that can influence fuel trim in all operating ranges, a faulty Mass Air Flow (MAF) sensor becomes a prime suspect. A MAF sensor that underestimates airflow will cause the ECU to deliver too little fuel, resulting in a lean condition and positive fuel trims.
In this case, further investigation of the MAF sensor is warranted. Checking the MAF sensor readings with an OBD2 scan tool and comparing them to specifications, or even performing a simple cleaning of the MAF sensor, could be the next logical step.
Case Study 2: Vacuum Leaks and Fuel Trim at Idle
Vacuum leaks are a common cause of driveability issues and can significantly impact fuel trim, particularly at idle. Figure 3 demonstrates the fuel trim behavior typical of a vehicle with intake air leaks.
Notice that the fuel trim values are highest at idle and tend to decrease as engine load increases. This is because vacuum leaks introduce unmetered air into the intake manifold after the MAF sensor. At idle, when manifold vacuum is high, the effect of the leak is more pronounced, leading to a leaner mixture and higher positive fuel trims. As engine speed and load increase, manifold vacuum decreases, and the proportion of unmetered air from the leak becomes less significant relative to the total airflow measured by the MAF sensor.
This fuel trim pattern strongly suggests a vacuum leak. Common sources include:
- Intake manifold gaskets
- Vacuum hoses
- PCV valve system
- Evaporative Emission (EVAP) system leaks, such as a faulty purge solenoid valve stuck open.
As shown in Figure 5, a purge solenoid stuck open can mimic a vacuum leak, especially at idle. When the purge solenoid is commanded open to vent fuel vapors from the charcoal canister, it introduces fuel vapor into the intake manifold. However, if it sticks open when it shouldn’t, it creates an uncontrolled vacuum leak.
In Figure 5, observe how the short-term fuel trim (STFT) initially goes negative when the purge solenoid is opened (indicating rich mixture from fuel vapor), and then quickly swings positive as the charcoal canister vapor is depleted and the uncommanded air leak dominates. This dynamic behavior is characteristic of a purge solenoid issue.
Fuel Trim and Fuel Delivery System Issues
While MAF sensor problems and vacuum leaks are frequent causes of fuel trim abnormalities, issues within the fuel delivery system can also manifest in fuel trim deviations.
-
Low Fuel Pressure: A weak fuel pump, clogged fuel filter, or fuel pressure regulator malfunction can lead to insufficient fuel delivery, resulting in lean conditions and positive fuel trims, especially under higher engine loads when fuel demand is greatest. However, in Gasoline Direct Injection (GDI) systems, low fuel pressure is more likely to trigger a P0087 (Fuel Rail System Pressure Too Low) code rather than P0171/P0174.
-
Clogged or Leaking Fuel Injectors: Clogged injectors restrict fuel flow, causing lean conditions and positive fuel trims. Leaking injectors, conversely, introduce excess fuel, leading to rich conditions and negative fuel trims. However, significant injector leaks are more likely to cause rich codes (P0172/P0175).
Advanced Fuel Trim Considerations: Additive and Multiplicative
For technicians working with enhanced scan tools, particularly on European vehicles, you may encounter the terms “additive” and “multiplicative” fuel trim.
-
Additive Fuel Trim: This term is often used synonymously with fuel trim adjustments at idle or low engine speeds. It reflects the amount of fuel added or subtracted as a fixed quantity, regardless of airflow.
-
Multiplicative Fuel Trim: This relates to fuel trim adjustments at higher RPMs and engine loads. It represents a percentage-based correction that is multiplied by the calculated fuel delivery based on airflow.
Understanding these terms can provide a more nuanced view of fuel trim behavior across different operating ranges, especially when using advanced diagnostic equipment. However, for most OBD2 diagnostics using generic scan tools, focusing on STFT and LTFT patterns across the four operating ranges discussed earlier provides sufficient insight.
It’s also crucial to remember that fuel trim strategies can vary between vehicle manufacturers. As Figure 6 illustrates with a Dodge Charger, some vehicles may primarily rely on STFT for immediate corrections, with LTFT adapting much more slowly, or even not at all in certain fault conditions. Always consult vehicle-specific service information when interpreting fuel trim data for a particular make and model.
Conclusion: Mastering OBD2 Fuel Trim for Efficient Diagnostics
OBD2 fuel trim is a powerful diagnostic parameter that offers a window into the engine’s air-fuel management system. By understanding how to interpret fuel trim data across different operating ranges, technicians and DIYers can significantly enhance their diagnostic efficiency and accuracy. Regularly practicing the four-step fuel trim baseline process, experimenting with known-good vehicles, and observing the fuel trim response to induced faults will solidify your understanding and make you a more proficient diagnostician. Embrace the power of OBD2 fuel trim and elevate your automotive diagnostic skills.
Download PDF Version