Connecting your OBD2 adapter via WiFi is a straightforward process, allowing you to diagnose your car wirelessly using your phone or tablet. This guide will walk you through the simple steps to establish a WiFi connection between your OBD2 ELM327 adapter and your mobile device, ensuring a smooth start to your car diagnostics journey.
Step #1: Establish WiFi Connection with Your OBD2 Adapter
First, ensure your OBDII ELM327 adapter with WiFi capability is correctly plugged into your vehicle’s diagnostic socket (OBDII port). Turn your car’s ignition to the “ON” position, or start the engine to power up the adapter. If your adapter has a power button, make sure it is switched on.
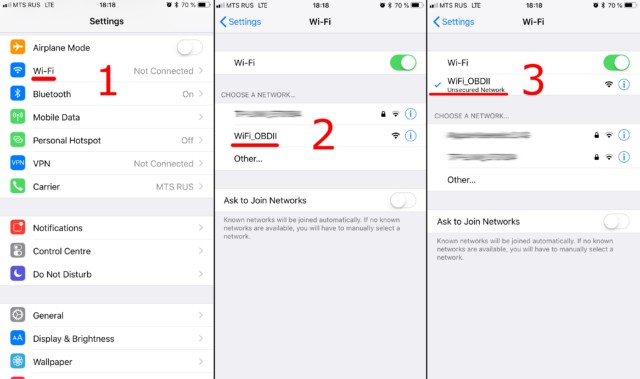
Next, on your smartphone or tablet, navigate to the Wi-Fi settings – this is in your device’s general settings, not within a car scanner app. Turn on Wi-Fi to begin scanning for available networks.
Your OBD2 WiFi adapter will broadcast a WiFi network. Look for a network name that typically resembles “OBDII”, “OBD2”, or “WIFI_OBDII”. Some adapters, like those from VGate, might use brand-specific names such as “VLINK”. Select your OBD2 adapter’s network to connect.
In most cases, these OBD2 adapter WiFi networks are open and do not require a password. However, if prompted for a password, consult the documentation provided with your adapter for the default credentials.
It’s important to remember that the WiFi network name will never be related to your car’s brand.
Step #2: Configure Your Car Scanner App for WiFi
Once your device is connected to the OBD2 adapter’s WiFi network, open your car scanner application. Access the app’s settings, usually found by tapping a gear icon located in the top-right corner of the main screen.
Within the settings menu, look for an option labeled “Adapter” or, in older app versions, “Connection”. Tap on this to access adapter connection settings.
In the connection settings, you will find a selection for “Connection type”. Choose “Wi-Fi” as your connection method.
Verify the adapter’s IP address and port settings. For the majority of OBD2 WiFi adapters, the standard IP address is “192.168.0.10” and the port is “35000”. However, some adapters may use different configurations. Always refer to the documentation that came with your specific OBD2 adapter to confirm these details and enter the correct values in your car scanner app if necessary.
That’s it! With these settings configured, you are now ready to connect. Look for a prominent “Connect” button within your car scanner app, often a large green button, and tap it to initiate the connection.
For subsequent uses, ensure your device is connected to the OBD2 WiFi network again and simply press the “Connect” button in your car scanner app to re-establish the diagnostic link.
