An illuminated check engine light can be unsettling, flashing on your dashboard and sparking immediate concern. Is it a minor hiccup, like a loose gas cap, or a sign of impending engine trouble? Fortunately, modern vehicles are equipped with an On-Board Diagnostics (OBD) system designed to detect and report issues. This system generates Diagnostic Trouble Codes (DTCs), which can pinpoint the source of the problem. Traditionally, reading these codes requires an OBD2 scanner, but what if you don’t have one readily available?
This guide will explore various methods to retrieve OBD2 codes without a dedicated scanner, empowering you to understand your vehicle’s health and potentially avoid a costly trip to the mechanic right away. We’ll delve into the meaning of your check engine light, the convenience of using a scanner, and practical DIY techniques to access those crucial codes when a scanner isn’t an option.
Understanding Your Check Engine Light: Severity Signals
The color and behavior of your check engine light are key indicators of the problem’s urgency. Pay close attention to how the light appears on your dashboard:
Solid Yellow or Orange: A steady yellow or orange check engine light signals that your OBD system has detected a malfunction in a system or component. While not an immediate emergency, it signifies that your vehicle isn’t operating optimally and requires attention. You generally have some leeway and can address it within a day or two, but it’s wise to investigate within 100 miles of driving. Scanning for codes should be your first step to understand the issue.
Solid Red: A solid red check engine light indicates a more serious issue that needs prompt attention. It suggests a problem that could potentially worsen if ignored. Driving to a nearby certified mechanic or repair shop for diagnosis and repair is advisable in this situation.
Flashing Check Engine Light: A blinking or flashing check engine light is a critical warning sign, often pointing to severe issues like engine misfires. This can cause significant damage to your catalytic converter if left unaddressed. Pulling over immediately and seeking roadside assistance to transport your vehicle to a professional is the recommended course of action.
The Scanner Advantage: Quick and Easy OBD2 Code Retrieval
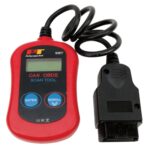
For most car owners and technicians, an OBD2 scanner is the go-to tool for reading engine codes. These scanners are readily available at auto parts stores, and some stores even offer free code scanning services. An OBD2 scanner plugs into your vehicle’s OBD2 port, typically located under the dashboard on the driver’s side. Once connected, it can quickly access and display DTCs, along with other valuable vehicle information like the VIN and calibration ID.
Using a scanner is straightforward:
- Plug in: Locate the OBD2 port and securely plug in the scanner.
- Turn ignition on: Turn your vehicle’s ignition to the “on” position (without starting the engine).
- Enter vehicle information: Follow the scanner’s prompts, which may include entering your VIN.
- Initiate scan: Select the “scan” option on the device.
- Read and record codes: The scanner will display the trouble codes. Write them down for further investigation.
Many scanners also offer the ability to clear codes after a repair is made. However, remember that clearing the code without fixing the underlying issue will only result in the check engine light reappearing.
Decoding Without a Device: DIY Methods to Get OBD2 Codes
While OBD2 scanners are convenient, there are alternative methods to retrieve diagnostic codes without one. These techniques utilize your vehicle’s built-in systems, such as the odometer or ignition system, to display or signal the trouble codes. Keep in mind that these methods might not be compatible with all vehicles, especially older models, and the way codes are displayed can vary.
Method 1: The Odometer Reset Technique
This method leverages your odometer’s reset button to display diagnostic codes directly in the odometer display.
- Press and hold reset: Press and hold the odometer reset button.
- Press and hold trip: While holding the reset button, press and hold the odometer trip button.
- Ignition to “on”: Keeping both buttons pressed, turn the ignition switch to the “on” position.
- Release buttons: Release both the reset and trip buttons.
- Observe odometer: The diagnostic trouble codes should appear in the odometer display. Record any codes shown.
Method 2: Multiple Ignition Cycles with Odometer Reset
If the first odometer method doesn’t work, your vehicle might require a sequence of ignition cycles to trigger code display.
- Press and hold both buttons: Press and hold the odometer reset and trip buttons simultaneously.
- Ignition “on”: Turn the ignition switch to the “on” position while holding the buttons.
- Ignition “off”: Turn the ignition switch back to the “off” position, still holding the buttons.
- Ignition “on” again: Turn the ignition switch back to the “on” position again, without releasing the buttons.
- Release buttons and check: Release the odometer buttons and observe the odometer display for trouble codes.
Method 3: Ignition Key and Dashboard Signals
This method uses the ignition key and relies on observing the check engine light itself to interpret codes, especially for older OBD-1 systems.
- Ignition cycle: Turn the ignition key “on” and “off” rapidly three to five times, ending in the “on” position (engine off).
- Warning light check: Ensure all dashboard warning lights illuminate momentarily.
- Observe check engine light: Watch for all lights to turn off except the check engine light.
- Odometer display check: Check if DTCs appear in the odometer display (for OBD-2 vehicles).
- Pulse counting (for OBD-1 or older): If no odometer display, carefully observe the check engine light for pulses and pauses. Count the pulses (blinks) – each pulse represents a digit, and pauses separate digits of the code. For example, “pulse, pulse, pulse, pulse, pulse, PAUSE, pulse, pulse, pulse” translates to code 53.
Method 4: The Paperclip Shortcut for OBD-1 Systems
For older vehicles with OBD-1 systems, a paperclip or jumper wire can be used to bridge terminals in the OBD port and trigger code output via blinking check engine light. Caution: Incorrectly bridging terminals can damage your vehicle’s electrical system. Proceed with caution and consult your vehicle’s repair manual for specific OBD-1 port terminal locations if you are unsure.
- Ignition off: Ensure the car is completely off.
- Locate OBD-1 port terminals: Find the diagnostic port (OBD-1) under the steering wheel and identify the correct diagnostic terminals (consult your vehicle’s service manual for the specific terminals to bridge – often labeled “TE1” and “E1” or similar).
- Bridge terminals: Using a paperclip or jumper wire, carefully connect the identified terminals to create a closed circuit.
- Ignition “on”: Turn the ignition switch to the “on” position (engine off).
- Count pulses: Observe the check engine light for blinking patterns (pulses and pauses) and decode the DTCs as described in Method 3.
When DIY Isn’t Enough: Seeking Professional Diagnosis
While these methods can help you retrieve OBD2 codes without a scanner, they have limitations. The codes obtained might be generic, and accurate diagnosis often requires specialized tools and expertise. If you’re uncomfortable with DIY methods, or if the check engine light persists after attempting a fix, seeking professional help is always a wise decision.
Taking your vehicle to a certified mechanic, repair shop, or dealership offers several advantages:
- Accurate diagnosis: Professionals have advanced diagnostic equipment and expertise to pinpoint the exact cause of the problem, going beyond generic codes.
- Comprehensive repair: They can perform the necessary repairs correctly and efficiently.
- Peace of mind: You gain assurance that the issue is properly addressed, ensuring your vehicle’s safety and reliability.
Protecting Yourself from Unexpected Repair Costs
A check engine light, even if initially seemingly minor, can sometimes indicate or lead to costly engine repairs down the line. Issues like catalytic converter failure or oxygen sensor damage can result from neglecting seemingly small problems. Consider an extended warranty or vehicle protection plan to safeguard yourself from unexpected and expensive repair bills.
Endurance Warranty provides various auto protection plans with flexible options to suit different budgets and vehicles, even for older or high-mileage cars. These plans offer financial security against mechanical breakdowns and often include benefits like 24/7 roadside assistance, towing, and repair location choices, providing added peace of mind for vehicle owners.
Don’t let a check engine light concern escalate into a major repair. Understanding how to access OBD2 codes, even without a scanner, is a valuable first step in addressing vehicle issues. However, remember that professional diagnosis and repair are crucial for complex problems. Explore vehicle protection options to further protect yourself from unforeseen automotive expenses and drive with confidence.