For BMW E36 enthusiasts looking to maximize engine performance, converting from OBD2 to OBD1 engine management can be a significant upgrade. While often described as a simple swap, this process requires meticulous attention to detail and a solid understanding of automotive mechanics. This guide, based on a real-world conversion experience, will walk you through the necessary steps, parts, and considerations for a successful OBD2 to OBD1 conversion, focusing on the key differences between Obd2 And Obd1 systems.
Originally equipped with OBD2 (On-Board Diagnostics II), later BMW E36 models, like the 1999 M3, can benefit from the older OBD1 system. OBD1 (On-Board Diagnostics I) offers a different approach to engine management, often favored in high-performance applications for its tuning flexibility and simpler electronics. This conversion is not just about swapping parts; it’s about understanding the nuances of each system and how they interact.
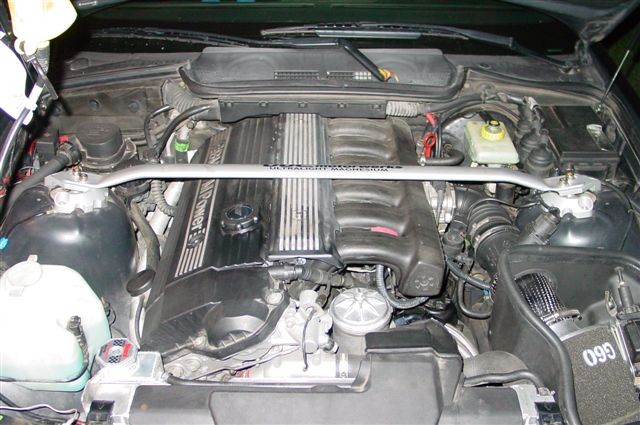
Here’s a look at an OBD2 S52 engine before the conversion process begins:
This guide stems from a conversion performed on a 1999 BMW M3 with OBD2 and EWS (Electronic Immobilizer System). The conversion utilized an OBD1 engine harness from a 1994 325i and a red-label 413 ECU (Engine Control Unit), known for its non-EWS compatibility and popular among tuners. A performance chip from Active Autowerkes was also used to optimize engine parameters.
Essential Components for OBD2 to OBD1 Conversion
To undertake this conversion, you will need a specific set of OBD1 parts to replace their OBD2 counterparts. Here’s a comprehensive list:
- OBD1 Engine Harness: The backbone of the electrical system, tailored for OBD1 sensors and ECU.
- OBD1 ECU (413 Red Label): Preferred for its non-EWS origin, simplifying installation in some models.
- OBD1 Performance Chip: Essential for tuning the OBD1 ECU to your engine modifications.
- OBD1 Intake Manifold: Known for superior airflow compared to OBD2 manifolds, contributing to performance gains.
- OBD1 Fuel Rail: Designed to accommodate the OBD1 fuel pressure regulator and fuel line configuration.
- OBD1 Crank Position Sensor: Different in location and type compared to OBD2 sensors.
- OBD1 Cam Position Sensor: Matches the OBD1 engine management system.
- OBD1 Knock Sensors (x2): Specific to the OBD1 engine configuration.
- OBD1 Oxygen Sensor: OBD1 systems typically use a single pre-catalyst oxygen sensor.
- OBD1 HFM (Hot-Film Air Mass Meter): Compatible with OBD1 ECU and intake system.
- OBD1 Main Engine Coolant Hose: Due to differences in coolant pipe design between OBD1 and OBD2.
- OBD1 Throttle Boot: Connects the HFM to the throttle body, designed for OBD1 components.
- OBD1 Throttle Body (Optional): While OBD2 throttle bodies can be adapted, OBD1 ensures direct compatibility.
- OBD1 Valve Cover and Coil Packs (Optional): Primarily for aesthetic or direct fitment reasons, OBD2 components can be retained with minor modifications.
While conceptually straightforward, the OBD2 to OBD1 conversion involves addressing several intricate details. Let’s delve into each key area:
1. Valve Cover and Coil Packs: OBD1 vs OBD2 Configurations
The OBD2 valve cover lacks routing provisions for OBD1 coil pack connectors. OBD2 wiring enters from the passenger side, while OBD1 wiring enters from the driver’s side. You have two main choices:
- Retain OBD2 Valve Cover: Keep your OBD2 valve cover and coil packs, modifying the valve cover slightly to accommodate OBD1 wiring. This maintains your existing OBD2 coil packs.
- Switch to OBD1 Valve Cover: Use an OBD1 valve cover, necessitating OBD1 coil packs. Both OBD1 and OBD2 coil versions are compatible with the OBD1 harness.
In this conversion, the decision was made to keep the OBD2 valve cover and modify it for wiring routing.
Here’s a comparison of OBD2 and OBD1 coil setups:
2. VANOS Solenoid Wiring: Adapting Connectors
The OBD2 VANOS (Variable NockenwellenSteuerung – Variable Valve Timing) solenoid wire connector is shorter than its OBD1 counterpart. To address this, you can:
- Use OBD1 Solenoid: Swap to an OBD1 VANOS solenoid for direct compatibility.
- Extend OBD2 Wiring: Keep the OBD2 solenoid and extend its wiring using BMW part # 12-52-2-274-971. This BMW transmission harness has identical connectors and is ideal for extending the VANOS solenoid wiring.
Here’s the BMW harness used for extending the VANOS solenoid wiring:
3. Coolant Pipe: Addressing Compatibility Differences
The main coolant pipe from the timing cover differs between OBD1 and OBD2. OBD2 uses a fixed metal pipe with sealant, while OBD1 uses a rubber hose connected to an aluminum neck. Solutions include:
- OBD1 Timing Cover: Replace the OBD2 timing cover with an OBD1 version.
- Coolant Pipe Adapter: Use a coolant pipe adapter from suppliers like Bimmerworld, Active Autowerkes, or Turner Motorsport. This adapter fits into the OBD2 timing case cover and allows connection of the OBD1 coolant hose using a pipe clamp.
The coolant pipe adapter is a cost-effective solution, as seen in this image:
(The coolant pipe adapter is the aluminum pipe visible below the oil filter housing in the image.)
4. Intake Manifold: Performance Gains with OBD1
The OBD1 M50 intake manifold is a key component for performance gains in this conversion. It offers improved airflow compared to OBD2 (M52/S52) manifolds. The OBD1 manifold is a direct bolt-on to M52/S52 cylinder heads without modification. It features an air temperature sensor and a vacuum port for the fuel pressure regulator on its underside.
5. Throttle Body: Adapter Plates and Gaskets
While the OBD2 throttle body can be reused, adaptation is necessary to seal correctly with the OBD1 intake manifold. OBD1 throttle bodies have a flat mating surface, whereas OBD2 throttle bodies are designed differently. Solutions include:
- Throttle Body Adapter Plate: Use an adapter plate to bridge the gap and provide correct mating surfaces for both OBD1 and OBD2 gaskets.
- Extended Gasket: Employ an extended gasket that allows the OBD2 throttle body to seal directly to the OBD1 intake manifold.
- OBD1 Throttle Body Swap: Using an OBD1 throttle body eliminates the need for adapters or special gaskets.
6. Coolant Temperature Sender: Wiring and Adapters
OBD2 systems use a single coolant temperature sender, while OBD1 uses two. For OBD1 conversion, you can:
- Splice Wiring: Splice the OBD1 harness wiring and use the OBD2 connector to connect to the single OBD2 sensor.
- Coolant Temp Sender Adapter: Utilize a plug-and-play wiring adapter from suppliers like Turner Motorsport for a cleaner installation.
7. Crank Position Sensor: Location and Sensor Swap
The OBD2 crank position sensor is located on the engine block, while OBD1 sensors are on the timing cover. You must use an OBD1 crank position sensor. The OBD2 sensor can remain in place to plug the hole in the block.
8. Fuel Lines and Fuel Pressure Regulator: Major System Differences
Fuel delivery systems differ significantly between OBD1 and OBD2. OBD2 fuel rails have fuel lines connecting at the rear, and the fuel pressure regulator is under the car, near the fuel filter. OBD1 fuel rails have the supply line at the front and the return line at the rear, with the fuel pressure regulator integrated into the fuel rail.
This conversion necessitates using the OBD1 fuel rail and modifying fuel lines. This involves removing the OBD2 fuel pressure regulator and routing new 8mm fuel lines to the OBD1 fuel rail. The OBD1 fuel pressure regulator vacuum line needs to be connected to the vacuum port on the OBD1 intake manifold.
9. PCV (Positive Crankcase Ventilation) System: Adapting Venting
OBD1 and OBD2 PCV systems have different setups. Adaptations depend on the valve cover choice:
- OBD2 Valve Cover: Retain the OBD2 PCV setup and mount the breather valve (cone-shaped plastic valve) under the intake manifold.
- OBD1 Valve Cover: Use the OBD1 breather valve that clips onto the crankcase vent port.
- Breather Catch Can: Connect a hose to the crankcase vent and use a breather catch can system.
In this instance, a combination approach was used, connecting the OBD2 valve cover to the OBD1 breather valve with a hose and adapting the oil drain line.
Here’s the custom PCV system setup:
10. Idle Control Valve (ICV): Reusing OBD2 Components
The OBD1 and OBD2 ICVs are identical and interchangeable. You can reuse your OBD2 ICV, but you’ll need the correct connector and hoses for the OBD1 intake manifold and throttle boot vacuum port connections.
11. Fuel Tank Breather: Adapting Vacuum Lines
The OBD2 fuel tank breather valve can be reused. Adapting it to the OBD1 system requires fittings to connect the vacuum hose to the vacuum port on the throttle boot. Standard hardware store fittings can be used for this purpose.
12. Oxygen Sensors and Secondary Air Pump: Emission System Changes
OBD2 systems include a secondary air pump and multiple oxygen sensors (pre-cat and post-cat). OBD1 systems do not use a secondary air pump and utilize only one pre-catalyst oxygen sensor. During conversion:
- Remove Secondary Air Pump: This entire OBD2 emission control system is eliminated.
- Oxygen Sensors: Disconnect and remove all OBD2 oxygen sensors. Plug the sensor ports in the exhaust system using M18 bolts.
13. Oil Pan and Dipstick: No Change Required
Contrary to some misconceptions, the OBD2 oil pan and dipstick are compatible and can be reused without modification in an OBD1 conversion.
14. EWS (Electronic Immobilizer System): Addressing Ignition Issues
EWS presence varies across E36 models. Even with a non-EWS ECU, ignition issues might arise. To prevent EWS-related problems, a simple wiring modification is needed:
- ECU Connector Modification: Locate wire #66 on the ECU connector (often green or black/violet). Cut this wire and insulate both ends with electrical tape. This modification bypasses potential EWS interference.
15. Power Distribution and Grounding: Careful Reconnection
Proper power and ground connections are crucial. Before starting, DISCONNECT THE NEGATIVE BATTERY POST.
- Power Distribution Box Relocation: The OBD2 power distribution box may need slight relocation to reach OBD1 harness power connections. Utilize existing screw holes from the removed secondary air pump to remount the box closer to the engine.
- Ground Connections: Ensure all ground connections are correctly re-established. OBD1 harnesses have specific ground points, including one under the OBD diagnostics port and a small wire from the spark plug rail that grounds to the engine hoist loop on the VANOS unit.
- Power Feeds: Identify and correctly connect power feeds (typically RED wires) and grounds (BROWN or BLACK wires). Double-check wiring if unsure.
Here’s the relocated power terminal after conversion:
16. General Wiring: Labeling is Key
Meticulous wiring is paramount. LABEL ALL CONNECTORS before installation. Use Bentley wiring schematics to identify each connector and label it clearly with painter’s tape. This significantly simplifies the installation process in the engine bay. Take pictures of OBD2 wiring, especially power and ground connections, before disassembly. Document starter wiring connections to avoid confusion during reassembly.
Here’s an example of a labeled OBD1 harness ready for installation:
Conclusion: OBD1 Conversion Benefits and Results
The OBD2 to OBD1 conversion, while detailed, offers tangible performance benefits for BMW E36 enthusiasts. This guide outlines the critical steps and considerations for a successful swap. Remember, careful planning, attention to detail, and accurate wiring are essential for optimal results.
Post-conversion, the test vehicle, a 1999 M3 with an OBD1 S52 engine and performance modifications, achieved notable dyno results:
Dyno Results:
- Initial Dyno (9-23-06): 253 RWHP (Rear Wheel Horsepower), 228 TQ (Torque). Slightly rich air-fuel ratio.
- Revised Dyno (10-19-06): 262 RWHP, 230 TQ. After ECU chip revision by Active Autowerkes to lean out the fuel mixture. Optimized AFR (Air-Fuel Ratio) and improved performance.
These dyno results demonstrate the performance potential of an OBD2 to OBD1 conversion when combined with other performance modifications. While the process is involved, the enhanced engine management and tuning flexibility of OBD1 can be a worthwhile upgrade for dedicated BMW E36 owners seeking to maximize their vehicle’s performance.