Navigating car troubles can be frustrating, especially when the check engine light illuminates on your dashboard. Fortunately, modern vehicles are equipped with On-Board Diagnostics (OBD2) systems that can pinpoint potential problems. Understanding how to retrieve these diagnostic trouble codes (DTCs) is the first step towards effective car maintenance and repair. This guide will walk you through the process of using an OBD2 diagnostic tool to retrieve codes, empowering you to understand issues, potentially including those related to an Obd2 Code 440, and take informed action.
Before we dive in, remember that while retrieving DTCs is a valuable diagnostic step, it’s crucial to avoid replacing parts based solely on the code definition. Each code, including common codes like OBD2 code 440 which often relates to evaporative emission system faults, has specific diagnostic procedures outlined in your vehicle’s service manual. Always consult this manual for complete testing guidelines to accurately identify the root cause of the problem.
Let’s get started on how to retrieve those valuable OBD2 codes.
Step 1 – Ensure the Ignition is OFF
| Ignition turned off in a car, a necessary first step for connecting a diagnostic tool. |
|---|
Begin by turning your vehicle’s ignition completely off. This ensures safe and proper connection with the diagnostic tool and prevents any electrical interference during the initial setup process.
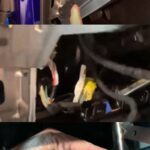
Step 2 – Locate the Data Link Connector (DLC)
| Locating the OBD2 Data Link Connector (DLC) inside a vehicle cabin, typically under the dashboard. |
|---|
The next step is to find your vehicle’s 16-pin Data Link Connector (DLC). This is the standard port used for accessing your car’s computer system. The DLC is commonly located under the dashboard on the driver’s side. Refer to your vehicle’s manual if you have trouble locating it, as its exact position can vary slightly depending on the make and model.
Step 3 – Connect the Diagnostic Tool to the DLC
Now, take your OBD2 diagnostic tool and connect its cable connector to the vehicle’s DLC. The connector is designed to fit only one way, ensuring correct alignment of the pins.
Note: If you encounter resistance when attaching the connector, try rotating it 180 degrees. If you still face difficulties, carefully inspect both the tool’s connector and the vehicle’s DLC for any signs of damage or debris that might be obstructing the connection. Once properly connected, many diagnostic tools will display a car symbol or power indicator, confirming a valid electrical connection to the vehicle’s system.
Step 4 – Turn the Ignition ON (Engine OFF)
| Ignition turned to the ‘ON’ position in a car, preparing for OBD2 diagnostic scan without starting the engine. |
|---|
Turn the ignition key to the “ON” position, but do not start the engine. This step powers up your vehicle’s computer systems, making them accessible to the diagnostic tool for communication and data retrieval.
Step 5 – Automatic Linking to the Vehicle’s Computer
The diagnostic tool is designed to automatically initiate communication with your vehicle’s computer system upon powering on and connecting to the DLC.
If your tool doesn’t power on automatically at this stage, it might indicate a lack of power at the vehicle’s DLC. Check your vehicle’s fuse panel and replace any blown fuses, particularly those related to the OBD2 system or Powertrain Control Module (PCM). If replacing the fuse doesn’t resolve the issue, consult your vehicle’s repair manual to identify the correct fuse and circuit for the computer and perform any necessary repairs before proceeding.
Step 6 – Communication Protocol Identification
| OBD2 diagnostic tool displaying “AUTO-LINK” as it identifies the vehicle’s communication protocol. |
|---|
The diagnostic tool will automatically begin checking the vehicle’s computer to determine the communication protocol it uses. This process is often indicated by an “AUTO-LINK” message and a progress bar on the tool’s display.
If the tool fails to establish a connection, a “Communication Error” message will appear. If this happens, ensure the following:
- OBD2 Compliance: Verify that your vehicle is OBD2 compliant. Most vehicles manufactured after 1996 are OBD2 compliant in the US, but it’s always good to confirm.
- DLC Connection: Double-check the connection at the DLC to ensure it’s secure and properly seated.
- Ignition Status: Confirm that the ignition is turned ON.
- Reset Attempt: Turn the ignition OFF, wait for about 5 seconds, and then turn it back ON to reset the vehicle’s computer.
- Retry Function: Press and hold the “DTC/FF/ DOWN ▼” button (or the designated retry button on your tool) to attempt the linking process again.
If the communication error persists, it suggests a deeper communication problem that may require further investigation of the vehicle’s wiring or computer system.
Step 7 & 8 – VIN Decoding and Vehicle Selection
In successful communication, the diagnostic tool will attempt to decode the Vehicle Identification Number (VIN).
- Successful VIN Decode (Step 7): If the tool successfully decodes the VIN, it will proceed directly to the OBD2 results screen (Step 9).
- Unsuccessful VIN Decode (Step 8): If the VIN cannot be decoded, one of two scenarios will occur:
- OEM DTCs Present: If the vehicle has stored Original Equipment Manufacturer (OEM) Diagnostic Trouble Codes, the “Select Make” screen will appear. Use the “DOWN ▼” button to choose your vehicle’s make and press “Enter ↵“. Then proceed to Step 9.
- No OEM DTCs: If no OEM DTCs are present, the screen will display “Global OBD2” results. Proceed to Step 9.
Step 9 – Retrieving and Displaying Diagnostic Trouble Codes (DTCs)
| OBD2 diagnostic tool displaying retrieved Diagnostic Trouble Codes (DTCs) and monitor status. |
|---|
After a brief period (approximately 2-3 seconds), the diagnostic tool will retrieve and display any Diagnostic Trouble Codes (DTCs), along with Monitor Status information and Freeze Frame Data that are stored in the vehicle’s computer memory.
If DTCs are present, they will be displayed on the tool’s LCD screen. If no codes are found, a message like “No Powertrain DTCs” or “No Freeze Frame Data presently stored” will be shown. Consult your diagnostic tool’s manual for a detailed explanation of the display elements and how to navigate the information presented.
Note: For lengthy code definitions, an arrow indicator on the display will signal the presence of additional information that can be scrolled through.
Step 10 – Reading and Interpreting DTCs with LEDs and LCD
| OBD2 diagnostic tool with Green, Yellow, and Red LEDs indicating engine system status alongside the LCD display. |
|---|
Diagnostic tools often use a combination of an LCD display and colored LEDs (Green, Yellow, Red) to provide quick visual cues about the engine system’s condition.
- Green LED: Indicates all engine systems are “OK” and operating normally. All monitors are active and performing diagnostics, and no DTCs are present. The LCD will typically display “No DTC” to confirm this.
- Yellow LED: Signals one of two conditions:
- Pending Code Present: A yellow LED may indicate a “Pending” code. Check the display for confirmation; a pending code will be shown with a numeric code and the word “Pending.”
- Monitor Not Run Status: If the yellow LED is lit, but the display shows zero DTCs, it means some of the vehicle’s monitors have not yet completed their diagnostic testing. Blinking monitor icons indicate tests not yet run, while solid icons signify completed tests.
- Red LED: Indicates a problem within one or more of the vehicle’s systems. The red LED also illuminates when DTCs are present, and in this case, the Malfunction Indicator Lamp (MIL), or Check Engine Light, on your dashboard will typically be illuminated.
Note: DTCs starting with “P00”, “P01”, “P02”, and “P03” are generic OBD2 codes, common across all OBD2-equipped vehicles. Codes starting with “P1” and “P3” are manufacturer-specific codes, meaning they are defined by the vehicle manufacturer. For example, while a P0440 code is a generic OBD2 code related to the EVAP system, its specific causes and troubleshooting steps might vary slightly depending on the car brand.
Step 11 – Navigating Multiple DTCs
| Using the “ENTER” button on an OBD2 tool to view Freeze Frame data associated with a DTC. |
|---|
| Using the “FF/DTC” button on an OBD2 tool to access Freeze Frame data. |
|---|
If your diagnostic tool retrieves more than one DTC, you can navigate through them using the tool’s buttons.
- Press the “ENTER ↵” button to view Freeze Frame data associated with the currently displayed DTC. Freeze Frame data is a snapshot of engine conditions recorded when an emissions-related fault occurs.
- Use the “DOWN ▼/UP ▲” buttons to scroll through the list of stored DTCs. Each press of these buttons will display the next DTC in sequence until all codes have been shown.
Note: Freeze Frame data captures crucial engine parameters like engine speed, coolant temperature, fuel pressure, and operating status (open/closed loop) at the moment a fault code is triggered. When multiple faults are present, only the highest priority code (usually the one that triggered the Check Engine Light) will have associated Freeze Frame data. This priority code is often designated as “01” on the diagnostic tool’s display.
Step 12 & 13 – Review and Determine System Condition
Step 12: After viewing the last retrieved DTC, pressing the “DOWN ▼” button again will typically return the display to the Priority code (code 01).
Step 13: Carefully review the displayed Diagnostic Trouble Codes, their definitions (if provided by the tool), and any available Freeze Frame data. Pay attention to the green, yellow, and red LEDs for an overview of the system status. This information will help you determine the condition of your engine systems and identify potential areas of concern, whether it’s a minor issue or something potentially related to a code like OBD2 code 440 indicating an EVAP system problem.
If DTCs are found and you decide to undertake repairs yourself, always begin by consulting your vehicle’s service manual. It contains detailed flowcharts, testing procedures, and diagnostic methods specific to each retrieved code, ensuring accurate diagnosis and repair.
By following these steps, you can effectively use an OBD2 diagnostic tool to retrieve diagnostic trouble codes, gain valuable insights into your vehicle’s health, and take informed steps towards maintenance and repair.