Are you looking to delve into the inner workings of your car using open-source tools? Connecting an OBD2 Bluetooth adapter to a Linux laptop is a powerful and cost-effective way to perform car diagnostics, monitor performance, and even troubleshoot issues yourself. This guide will walk you through the process of setting up an OBD2 Bluetooth connection with a Linux system, empowering you to understand your vehicle’s data like never before.
This tutorial builds upon the experience of connecting an OBD2 Bluetooth adapter to a Linux laptop (specifically CentOS 6.3 on an Acer Aspire One), aiming to provide a clear and comprehensive guide for enthusiasts and DIY mechanics. We’ll cover everything from identifying your OBD2 port to visualizing car data using Linux-based software.
Visualization of car trip data, demonstrating the potential of OBD2 Linux Bluetooth diagnostics.
Let’s break down the setup process step-by-step, starting from your vehicle and moving towards your Linux system.
1. Locating Your Car’s OBD2 Port
Most modern vehicles manufactured after 1996 are equipped with an OBD2 (On-Board Diagnostics II) port. This standardized port provides access to a wealth of information about your car’s engine, emissions, and other systems.
The OBD2 port is typically located within the passenger compartment, often under the dashboard on the driver’s side. In some vehicles, like the Opel/Vauxhall Astra (2004 model) mentioned in the original post, it might be hidden behind a panel.
An example of an OBD2 port, commonly found under the dashboard.
Finding Your Port:
- Consult your car’s service manual: This is the most reliable source of information.
- Online search: Search online for “[your car make and model] OBD2 port location”.
- Physical inspection: Look under the dashboard, around the steering column, and in the glove box area. You might need a flashlight.
Once you’ve located the port, ensure it’s easily accessible for connecting the Bluetooth adapter.
2. Choosing the Right OBD2 Bluetooth Adapter
The market offers a wide array of OBD2 Bluetooth adapters. When selecting one, consider compatibility with both your car and your intended software. For users interested in iOS devices, Wi-Fi OBD2 adapters might be more suitable due to Apple’s Bluetooth restrictions, but for Linux, Bluetooth adapters are ideal.
The “Supper Mini Bluetooth Car Code Reader / ELM327 Power 2” adapter, as used in the original guide, is a popular and affordable option. Adapters based on the ELM327 chip are widely supported by OBD2 software.
The “Supper Mini Bluetooth Car Code Reader / ELM327 Power 2” OBD2 adapter, a compact and Bluetooth-enabled device.
Key Features to Consider:
- Bluetooth compatibility: Ensure it supports Bluetooth standards compatible with your Linux laptop.
- ELM327 chip: Many software applications are designed to work with ELM327-based adapters.
- Reviews and ratings: Check user reviews for reliability and performance.
- Power consumption: While generally low, some adapters might draw power even when the car is off. Consider disconnecting it when not in use, especially for extended periods, to avoid battery drain, as noted in the original post’s experience with potential battery drain.
The OBD2 Bluetooth adapter connected to the car’s OBD2 port, ready for pairing with a Linux laptop.
3. Setting Up Bluetooth on Your Linux Laptop
If your Linux laptop doesn’t have built-in Bluetooth, you’ll need a USB Bluetooth adapter. The Belkin mini Bluetooth adapter mentioned in the original article is a good example of a compact and Linux-compatible option. When choosing a USB adapter, verify Linux compatibility, often found in product reviews or online forums.
A compact Belkin mini Bluetooth adapter, suitable for adding Bluetooth functionality to Linux laptops.
Linux Bluetooth Software:
For managing Bluetooth connections on Linux, blueman is a recommended and user-friendly software.
Installation (Debian/Ubuntu based distributions):
sudo apt-get install bluemanInstallation (Red Hat/CentOS based distributions):
sudo yum install bluemanblueman provides a graphical interface for managing Bluetooth devices. While gnome-bluetooth might be pre-installed, blueman often offers better stability and features for OBD2 connections. You can remove gnome-bluetooth if you prefer to use blueman exclusively.
Removing gnome-bluetooth (if needed):
sudo rpm -e gnome-bluetooth gnome-bluetooth-libs --nodeps # For RPM based systems
sudo apt-get remove gnome-bluetooth # For Debian based systems
After installation, a Bluetooth icon should appear in your system panel, indicating that Bluetooth is ready.
4. Pairing the OBD2 Bluetooth Adapter with Linux
- Turn on your car’s ignition: Turn the key to the “ON” position (position II) to power the car’s electronics without starting the engine. This activates the OBD2 port.
- Power on your Linux laptop and Bluetooth: Ensure Bluetooth is enabled on your laptop.
- Initiate device setup: Right-click the Bluetooth icon in your system panel and select “Setup new device…” or similar option in
blueman. - Device discovery:
bluemanwill scan for nearby Bluetooth devices. The “OBDII” adapter should appear in the list. Select it and click “Forward” or “Pair”. - Passkey entry: When prompted for a passkey, select “Use Custom Passkey” and enter “1234”. This is a common default passkey for OBD2 Bluetooth adapters, but check your adapter’s documentation if it’s different.
Entering the passkey “1234” to pair with the OBD2 Bluetooth adapter.
- Service selection: Choose “Serial Port” when prompted to select the service. This establishes a serial communication channel over Bluetooth, which is necessary for OBD2 data transfer.
Selecting the “Serial Port” service for the OBD2 Bluetooth connection.
- Confirmation: Upon successful pairing, you should receive a confirmation message indicating that the OBD2 adapter is connected as a serial port.
Confirmation message indicating successful Bluetooth pairing and serial port connection.
5. Choosing and Setting Up OBD2 Software on Linux
With the Bluetooth connection established, you’ll need software to interpret the OBD2 data. The original guide used “ScanTool”, a program from ScanTool.net. While ScanTool can work, there are more modern and actively developed open-source alternatives available for Linux.
Recommended Linux OBD2 Software:
- PyOBD: A Python library and toolkit for OBD-II interaction. It’s command-line based but powerful and scriptable.
- OBD-Py: Another Python OBD-II library, offering a simpler interface and cross-platform compatibility.
- Freediag: Mentioned in the original post, Freediag is a more comprehensive open-source diagnostic tool with a graphical interface.
- ScanMyTesla (for Tesla vehicles): While specific to Tesla, it demonstrates the growing ecosystem of open-source car diagnostic tools on Linux.
Setting up ScanTool (following the original guide):
If you choose to use ScanTool as in the original guide, download the scantool_net121src.zip source archive from ScanTool.net.
Compilation and Setup (as outlined in the original guide – may require adjustments for newer Linux distributions):
-
Extract source code:
mkdir scantool
mv scantool_net121src.zip scantool
cd scantool
unzip scantool_net121src.zip
Install
unzipif needed:sudo yum install unziporsudo apt-get install unzip. -
Modify Makefile: Adjust the
makefileas described in the original guide to ensure proper compilation on modern Linux systems, particularly concerningallegrolibrary linking and termios definitions. -
Patch source code: Apply the mentioned patches to
main.candserial.cfor timestamp logging and termios compatibility. -
Compile: Run
maketo compile the ScanTool software. -
Create symlink for serial port: ScanTool expects serial data from
/dev/ttyS3, while Bluetooth creates/dev/rfcomm0. Create a symbolic link:cd /dev sudo rm -f ttyS3 sudo ln -s rfcomm0 ttyS3 sudo chmod 766 rfcomm0
Running ScanTool:
Execute the compiled ScanTool binary. You might see a warning, click “CONTINUE”. Then, click “Sensor Data” to view live OBD2 data.
Warning message in ScanTool, typically safe to continue.
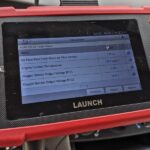
Live sensor data displayed in ScanTool, showing real-time readings from the car’s OBD2 system.
6. Processing and Visualizing OBD2 Data
ScanTool, and many other OBD2 software options, allow logging data to a file. The original guide used comm_log.txt and a Perl script process_comm_log.pl along with gnuplot to visualize the data.
Data Logging and Visualization:
- Logging: Configure your chosen OBD2 software to log data to a file.
- Processing: Use scripting languages like Python or Perl (as in the original example) to parse the log file and extract relevant data.
- Visualization:
gnuplotis a powerful command-line plotting tool for creating graphs from data files. Alternatively, Python libraries likematplotliborseabornoffer more flexible visualization options.
The Perl script process_comm_log.pl and gnuplot script trip.gp from the original guide provide a starting point for data processing and visualization. You can adapt these or create your own scripts based on your preferred tools and data analysis needs.
By following these steps, you can establish an Obd2 Linux Bluetooth connection and start exploring your car’s data. This setup empowers you with valuable insights into your vehicle’s health and performance, all within the open and customizable environment of Linux. Experiment with different software, explore various OBD2 PIDs (Parameter IDs), and unlock the potential of DIY car diagnostics!