The Obd2 P0325 code, often flagged as “Knock Sensor 1 Circuit Malfunction,” indicates a problem within your vehicle’s knock sensor system. As a crucial component for engine health, understanding and addressing this code promptly is essential. This article provides a comprehensive guide to diagnosing and resolving the P0325 error code, ensuring your engine operates smoothly and efficiently.
Understanding the P0325 Code: Knock Sensor 1 Circuit Malfunction
The P0325 code is triggered when your vehicle’s Powertrain Control Module (PCM) detects an anomaly in the signal from knock sensor 1 or its circuit. To grasp the significance of this, it’s important to understand the knock sensor’s role.
What is a Knock Sensor?
Engine knock, or detonation, is the uncontrolled combustion of fuel in the engine cylinder after the spark plug initiates the normal combustion process. This abnormal combustion creates pressure waves and vibrations – “knocking” sounds – that can severely damage engine components over time.
The knock sensor is designed to detect these vibrations. It’s essentially a small microphone that listens to the engine. When it senses engine knock, it sends a voltage signal back to the PCM.
The PCM then responds by retarding the ignition timing. Retarding the timing means the spark plugs fire slightly later in the combustion cycle, reducing the likelihood of knock. This adjustment is crucial for protecting the engine from damage and maintaining optimal performance.
How the P0325 Code is Set
The P0325 code specifically points to a malfunction in the “Knock Sensor 1 Circuit.” The PCM continuously monitors the voltage signal from the knock sensor. The code is set under specific conditions when the PCM detects that the knock sensor input voltage is:
- Above 4.0 volts or less than or equal to 1.0 volt when the engine speed is at or above 2200 rpm.
- Equal to 0.0 volts when the engine speed is below 2200 rpm.
These voltage readings outside the expected range indicate a potential issue within the knock sensor circuit, prompting the PCM to log the P0325 code and illuminate the Malfunction Indicator Lamp (MIL), or check engine light. This diagnostic typically runs under open throttle conditions and at engine speeds above 2000 rpm, not during idle or deceleration.
Symptoms of a P0325 Code
While a P0325 code is primarily an electrical fault, it can manifest in noticeable symptoms affecting your vehicle’s performance:
- Check Engine Light: This is the most immediate and obvious symptom. The MIL will illuminate on your dashboard to alert you of a problem.
- Reduced Engine Performance: The PCM may retard ignition timing as a precautionary measure when a knock sensor issue is suspected. This can lead to a noticeable decrease in engine power and acceleration, especially during demanding driving conditions like uphill climbs or when carrying heavy loads.
- Poor Fuel Economy: Retarded ignition timing is less efficient. You might observe a decrease in your vehicle’s miles per gallon (MPG) as the engine works harder to compensate for the timing adjustments.
- Engine Knocking Noises (Potentially): Ironically, while the sensor is supposed to detect knock, a faulty sensor or circuit might prevent the PCM from accurately responding to real engine knock. In severe cases, especially if the underlying issue causing knock is present (like high engine temperature or low octane fuel), you might actually hear engine knocking or pinging sounds, particularly under load.
Possible Causes of the P0325 Code
Several factors can trigger a P0325 code. Pinpointing the exact cause is crucial for effective repair. The common culprits include:
- Faulty Knock Sensor: The knock sensor itself might be defective. Over time, sensors can fail due to heat, vibration, and general wear and tear.
- Wiring Issues: This is a frequent cause. The wiring harness and connectors associated with the knock sensor circuit are exposed to harsh engine conditions. Problems can include:
- Open Circuit: A break in the wiring preventing signal flow.
- Short Circuit to Voltage: The signal wire is contacting a voltage source, sending an incorrect high voltage reading to the PCM.
- Short Circuit to Ground: The signal wire is grounding out, resulting in a low or zero voltage reading.
- High Resistance in the Circuit: Corrosion or loose connections can increase resistance, weakening the signal.
- PCM Failure (Rare): In very rare instances, the PCM itself could be faulty, misinterpreting sensor signals or having internal circuit problems. However, this is usually diagnosed after ruling out all other possibilities.
- Loose Knock Sensor: If the knock sensor is not properly tightened to the engine block, it may not be able to accurately detect vibrations.
- Carbon Buildup or Engine Issues Causing Real Knock: While the P0325 code is usually about the sensor circuit, it’s important to consider if there’s an underlying engine problem causing actual knock. Excessive carbon deposits, incorrect fuel octane, or engine overheating can all lead to knock, which could contribute to sensor malfunction over time or trigger the code indirectly if the PCM’s adjustments are insufficient.
Diagnosing and Repairing the P0325 Code
Troubleshooting a P0325 code requires a systematic approach. Here’s a step-by-step guide:
1. Initial Inspection and Code Verification:
- Scan for Codes: Use an OBD2 scanner to confirm the presence of the P0325 code and check for any other related codes. Record all codes present.
- Visual Inspection: Carefully inspect the knock sensor and its wiring. Look for any obvious signs of damage, such as:
- Damaged or frayed wires
- Corroded or loose connectors
- Physical damage to the sensor itself
2. Wiring and Circuit Testing:
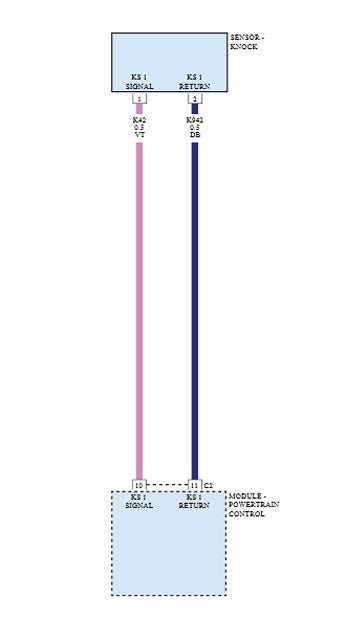
- Check Wiring Diagram: Consult your vehicle’s service manual for the specific wiring diagram for the knock sensor circuit. This will show you wire colors, connector locations, and circuit layout.
- Continuity Test: Use a multimeter to perform continuity tests on the knock sensor circuit wires. Check for:
- Continuity in each wire: Ensure there are no breaks in the wires between the PCM and the knock sensor connector.
- Shorts to ground: Check for continuity between the signal wire and ground. There should be no continuity.
- Shorts to voltage: Check for voltage on the signal wire with the sensor disconnected and ignition on (carefully, as there shouldn’t be significant voltage).
- Voltage Check at Sensor Connector: With the ignition ON and the sensor disconnected, check for the presence of reference voltage (usually 5V) at the sensor connector from the PCM.
3. Knock Sensor Testing (If Wiring is OK):
- Sensor Resistance Test: Use a multimeter to measure the resistance of the knock sensor itself. Compare the reading to the manufacturer’s specifications (refer to your service manual). An open circuit or significantly different resistance reading indicates a faulty sensor.
- Sensor Output Voltage Test (Advanced): Some advanced diagnostic procedures involve using an oscilloscope to monitor the sensor’s output voltage while gently tapping near the sensor (simulating knock). This requires specialized equipment and knowledge.
4. Knock Sensor Replacement:
If wiring checks out and sensor tests indicate a fault, sensor replacement is likely necessary.
- Location: Knock sensors are typically located on the engine block or intake manifold. Refer to your service manual for the exact location on your vehicle.
- Removal:
- Disconnect the negative battery cable.
- Locate the knock sensor, often accessible from underneath the vehicle. You may need to remove underbody panels for access.
- Disconnect the electrical connector from the knock sensor.
- Remove the mounting bolt securing the sensor.
- Carefully remove the knock sensor.
- Installation:
- Clean Mounting Surface: Thoroughly clean the knock sensor mounting area on the engine block to ensure good contact.
- Install New Sensor: Install the new knock sensor and mounting bolt.
- Torque Specification is Critical: Crucially, tighten the mounting bolt to the exact torque specification recommended by the manufacturer (typically around 18 ft-lbs or 25 Nm). Over or under-tightening can severely affect sensor performance and trigger the code again. Use a torque wrench for accurate tightening. Do not use any thread locker or sealant on the bolt.
- Connect Electrical Connector: Reconnect the electrical connector to the knock sensor.
- Reinstall Underbody Panels: Reinstall any underbody panels that were removed.
- Reconnect Battery: Reconnect the negative battery cable.
5. Post-Repair Verification and Code Clearing:
- Clear DTCs: Use an OBD2 scanner to clear the P0325 code and any other stored Diagnostic Trouble Codes (DTCs).
- Test Drive: Perform a test drive to see if the check engine light returns and if the P0325 code reappears. Monitor engine performance.
- Scan Again: After the test drive, scan for codes again to ensure the repair was successful and no new issues have arisen.
Maintaining Your Knock Sensor System
Preventative maintenance is key to avoiding knock sensor issues:
- Regular Vehicle Inspections: Have your vehicle inspected regularly by a qualified mechanic. They can check wiring and sensor connections during routine maintenance.
- Use Recommended Fuel Octane: Always use the fuel octane rating recommended for your vehicle. Lower octane fuel can increase the risk of engine knock.
- Address Engine Issues Promptly: Deal with any engine problems like overheating or misfires promptly, as these can contribute to engine knock and stress the knock sensor system.
By understanding the OBD2 P0325 code, its causes, and the diagnostic and repair procedures, you can effectively address knock sensor circuit malfunctions and ensure the longevity and performance of your engine. Remember to consult your vehicle’s service manual for specific procedures and torque specifications related to your make and model. If you’re not comfortable performing these repairs yourself, always seek the assistance of a qualified automotive technician.