Understanding your car’s health is becoming increasingly accessible, thanks to OBD2 scanners. These handy devices empower you to tap into your vehicle’s onboard computer, read diagnostic trouble codes (DTCs), and gain insights into potential issues. Whether you’re a seasoned DIY enthusiast or a car owner curious about that pesky check engine light, knowing how to use an OBD2 scanner is a valuable skill. This guide will walk you through the process, making car diagnostics less of a mystery.
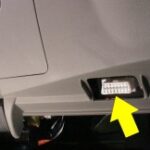
The first step is locating your OBD2 port. In almost every car and light truck manufactured since 1996, you’ll find a standardized 16-pin Diagnostic Link Connector (DLC), commonly known as the OBD2 port. It’s typically located under the dashboard on the driver’s side. You might need to peek under the steering column area. In some vehicles, it might be subtly placed within the center console or even on the passenger side, but the driver’s side under the dash is the most common location.
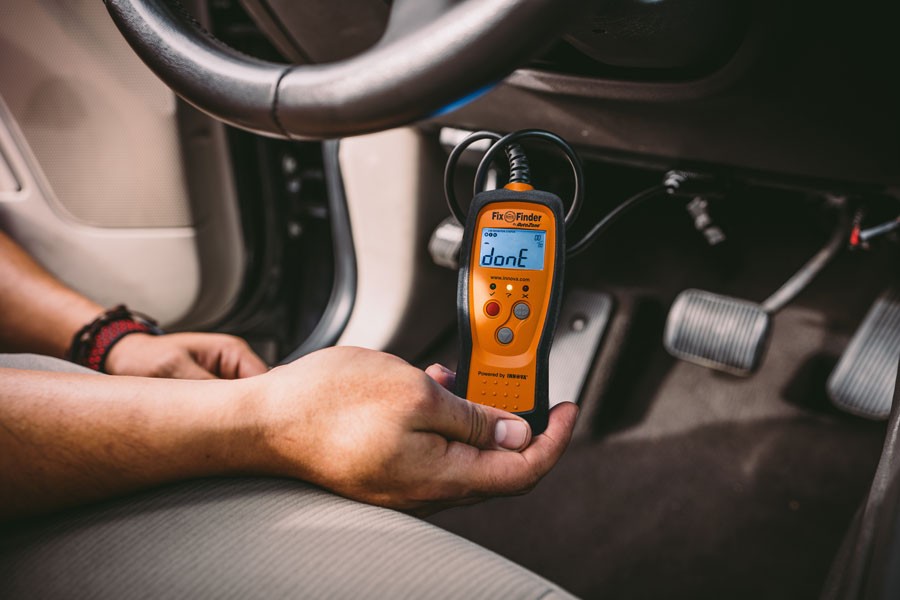
Connecting your OBD2 scanner is straightforward. The connector is designed to be user-friendly, ensuring it only fits one way. Simply align the trapezoidal shape of the scanner’s plug with the OBD2 port and gently push them together until they are firmly connected. A slight wiggle can sometimes help ensure a secure connection.
Here’s the recommended sequence for connecting your OBD2 scanner:
- Turn Off the Ignition: Ensure your car’s ignition is completely off before you begin.
- Locate and Connect: Plug your OBD2 scanner into the diagnostic port you’ve located.
- Turn Ignition to ‘On’ (Engine Off): Turn the ignition key to the ‘ON’ position. This powers up the car’s electrical systems, including the OBD2 port, without starting the engine.
- Power Up the Scanner: In most cases, the OBD2 port will supply power to your scanner, and it will automatically turn on.
- Wait for Boot-Up: Give your scanner a moment to complete its start-up sequence.
Once powered on, your OBD2 scanner may prompt you for additional vehicle information. This could include the engine size, Vehicle Identification Number (VIN), or instructions to start the engine, depending on the scanner’s capabilities and the functions you intend to use.
Navigating the OBD2 Scanner Menu
After your OBD2 scanner boots up, you’ll be presented with a menu. The complexity of this menu will vary based on whether you have a basic code reader or a more advanced professional-grade scan tool. However, common options you’ll likely encounter include:
- Read Codes (or Diagnostic Codes): Selecting this option commands the scanner to retrieve and display any stored or pending Diagnostic Trouble Codes (DTCs). These codes are essentially error messages from your car’s computer, indicating potential problems. The scanner may also provide a brief text description of the fault associated with each code. If multiple codes are present, the scanner will usually scroll through them.
- Erase Codes (or Clear Codes): This function allows you to clear or reset the DTCs stored in your vehicle’s computer. Typically, the scanner will ask for confirmation before erasing codes to prevent accidental clearing. It’s important to understand that erasing codes doesn’t fix the underlying problem that triggered the code; it only clears the error message. The code may reappear if the issue persists.
- Live Data (or Data Stream): For scanners with this capability, you can access real-time data from your vehicle’s sensors. This allows you to monitor parameters like engine temperature, RPM, oxygen sensor readings, and more as your car is running. Live data is invaluable for diagnosing intermittent issues or observing sensor behavior under different driving conditions.
- Freeze Frame Data: This feature captures a snapshot of sensor readings and vehicle parameters at the exact moment a DTC was set. Freeze frame data provides valuable context for understanding the conditions under which a fault occurred, aiding in diagnosis.
- Vehicle Information (or Vehicle Info): This section typically displays basic information about your vehicle, often retrieved from the car’s computer, such as the VIN and vehicle build details.
- I/M Readiness (Inspection/Maintenance Readiness): This option is particularly useful for emissions testing. It checks the status of various emissions-related systems and indicates whether your vehicle is ready for a smog check. It can reveal potential issues that might cause you to fail an emissions test.
Navigating the scanner menu is usually done using buttons on the device. Most scanners have arrow buttons for scrolling through menu options and an ‘Enter’ or ‘OK’ button for selecting an option. A ‘Back’ or ‘Escape’ button is also common for returning to the previous menu. Even Bluetooth or Wi-Fi OBD2 scanners controlled by smartphone apps typically mimic this button interface within the app.
Decoding OBD2 Trouble Codes
 OBD-II scanner displaying diagnostic trouble codes
Once you select “Read Codes,” your scanner will display codes that need interpretation. You might see a brief description on the screen, but often you’ll need to delve deeper to fully understand the code. OBD2 codes follow a standardized five-character format: one letter followed by four numbers, like P0301.
The first letter indicates the vehicle system where the fault is located:
- P (Powertrain): Relates to the engine, transmission, fuel system, and emissions control systems. This is the most common category for check engine light issues.
- B (Body): Indicates problems within body control systems, such as airbags, power windows, interior lighting, and other comfort or convenience features.
- C (Chassis): Points to issues with chassis systems, including the anti-lock braking system (ABS), suspension, power steering, and ride control.
- U (Network or Undefined): Signifies communication or network-related problems between the vehicle’s various computer modules.
The numbers following the letter provide more specific information. The first number (after the letter) is either a 0 or 1:
- 0: Indicates a generic code. These codes are standardized across all vehicle manufacturers, meaning a P0101 code, for example, will generally mean the same thing regardless of the car brand.
- 1: Indicates a manufacturer-specific code. These codes are defined by the specific car manufacturer and may have a more detailed or nuanced meaning than generic codes.
The third digit further specifies the subsystem:
- 1: Fuel and Air Metering
- 2: Fuel and Air Metering (Injector Circuit)
- 3: Ignition System or Misfire
- 4: Auxiliary Emission Controls
- 5: Vehicle Speed Control & Idle Control System
- 7, 8, 9: Transmission
The final two digits provide even finer detail about the specific fault within the identified system. There are hundreds of possible combinations and detailed descriptions for OBD2 codes.
Let’s revisit our example code: P0301. Breaking it down:
- P: Powertrain (engine or transmission related)
- 0: Generic code (standard across manufacturers)
- 3: Ignition system or misfire
- 01: Specific to cylinder #1
Therefore, P0301 indicates a generic powertrain code related to the ignition system, specifically a misfire detected in cylinder #1.
Saving Money with an OBD2 Scanner
Owning an OBD2 scanner offers several ways to save on car repair costs.
Firstly, when your check engine light illuminates or you notice a performance issue, a quick scan provides an initial clue to the problem’s source. While it may not pinpoint the exact cause, it directs you to the affected system, giving you a starting point for diagnosis.
Secondly, an OBD2 scanner can help you determine if your vehicle is ready for an emissions test. The I/M Readiness function can highlight potential problems that might lead to failing a smog check, allowing you to address them proactively.
Furthermore, if you’re comfortable with DIY car repairs, an OBD2 scanner can save you money on both diagnostics and repairs. For instance, a P0138 code, indicating a high voltage issue with the bank 1 sensor 2 oxygen sensor, often points to a faulty sensor. By identifying this yourself, you can purchase and replace the sensor, clear the code with your scanner, and resolve the issue without a costly trip to a mechanic.
Ready to take control of your car’s diagnostics? Explore OBD2 scanners at AutoZone to find the right tool for your needs and expand your DIY capabilities. You can also take advantage of our Loan-A-Tool program to borrow a scanner for free.
Frequently Asked Questions (FAQs) About OBD2 Scanners
How do you use an OBD II scanner?
Simply plug the scanner into your car’s OBD2 port (usually under the dash), turn the ignition to the ‘ON’ position (engine off), and follow the on-screen prompts to read codes or access other functions.
Does the car need to be running to use an OBD2 scanner?
No, in most cases, you can read trouble codes and perform basic scans with just the ignition in the ‘ON’ position. The engine does not need to be running. However, for live data monitoring, you will need to start the engine.
How do I interpret the readings on my OBD scanner?
Select “Read Codes” to display DTCs. Note down the codes. The first letter indicates the system (P, B, C, U), and the numbers provide specific fault information. Use online resources or a repair manual to understand the precise meaning of each code.
Can I plug in an OBD scanner while the car is running?
While technically possible, it’s generally not recommended to plug in or unplug an OBD scanner while the engine is running. It’s best practice to turn the ignition off before connecting or disconnecting the scanner to avoid potential electrical glitches or damage. If you need to initiate a scan while the engine is running (e.g., for live data), connect the scanner with the ignition off, then start the engine.