Maintaining optimal tire pressure is crucial for vehicle safety, fuel efficiency, and tire longevity. Modern vehicles are equipped with Tire Pressure Monitoring Systems (TPMS), but accessing this data in real-time can sometimes be challenging without the right tools. Fortunately, with an Obd2 Tpms App and a compatible OBD2 adapter, you can conveniently monitor your tire pressure directly from your smartphone or tablet. This guide will walk you through the process of using an OBD2 TPMS app, specifically focusing on the OBDLink app and MX+ adapter, to access real-time TPMS data on your vehicle. Whether you’re a seasoned car enthusiast or a DIY beginner, understanding how to use an obd2 tpms app can empower you with valuable insights into your vehicle’s health.
To begin, ensure you have the necessary equipment: an OBDLink MX+ adapter, a compatible smartphone or tablet (Android device in this example), and the OBDLink app installed. For vehicles like Toyota, Lexus, and Scion, you’ll also need to install the Enhanced OEM Add-Ons within the OBDLink app to access advanced parameters like TPMS. This guide is based on testing conducted on a 2019 Toyota 4Runner, but the general principles apply to many OBD2-compliant vehicles.
Let’s delve into the step-by-step process to set up your obd2 tpms app and start monitoring your tire pressures.
Setting Up Your OBD2 TPMS App
The initial setup involves configuring the OBDLink app with your vehicle details and ensuring your OBDLink MX+ adapter is up-to-date. Follow these steps carefully:
1. Configure Vehicle Parameters in the OBDLink App:
Before connecting to your OBD2 adapter, it’s essential to input your vehicle information into the OBDLink app. This allows the app to accurately interpret data from your car’s computer.
(a) Open the OBDLink App: Launch the OBDLink application on your Android device.
(b) Do NOT Connect to MX+: Ensure that your app is not currently connected to the OBDLink MX+ adapter. If it is, disconnect it.
(c) Access Settings: Navigate to the “Settings” menu within the app.
(d) Open Vehicle Editor: Select “Vehicle Editor” from the settings options.
(e) Enter Vehicle Information: Input the details of your vehicle, such as make, model, and year. Accurate information here is crucial for correct data interpretation.
(f) Enhanced Network Setting – Select “Prompt”: For the “Enhanced Network” setting, it’s vital to choose “Prompt”. This setting allows you to manually select the specific network you want to access, such as TPMS, when you connect. This is key for using your obd2 tpms app for tire pressure monitoring.
(g) Default Settings: For other settings pages, use the default values if you are unsure. You can customize options like “Engine Size” and “Fuel Tank Capacity” if you know these details for your vehicle.
(h) Save and Exit: Press the back button to save your vehicle settings and return to the main settings menu.
2. Update MX+ Firmware:
Keeping your OBDLink MX+ adapter’s firmware updated ensures optimal performance and compatibility with the OBDLink app and your vehicle.
(a) Plug in MX+: Connect the OBDLink MX+ adapter into your vehicle’s OBD II port. This port is typically located under the dashboard on the driver’s side. Open the OBDLink app if it’s not already running.
(b) Disconnect from MX+ (if connected): Make sure the app is not connected to the MX+ adapter before proceeding with the firmware update.
(c) Go to Firmware Updates: In the “Settings” menu, select “Firmware Updates”.
(d) Check for Updates: Tap on “Check for Updates”. The app will communicate with the OBDLink server to see if a newer firmware version is available for your MX+ adapter.
(e) Update Firmware (if available): If an update is available, select “Update Firmware” to begin the process. Follow the on-screen instructions to complete the firmware update. This ensures your obd2 tpms app and adapter work seamlessly.
(f) Return to Settings: Once the firmware update is complete, press the back button to return to the settings menu.
3. Set Units Preferences:
Configuring your preferred units ensures that the TPMS data is displayed in a format you understand. For tire pressure, “psi” (pounds per square inch) is a common unit in many English-speaking countries.
(a) Open OBDLink App (if not open): Launch the OBDLink app if it’s not already running.
(b) Disconnect from MX+ (if connected): Ensure the app is disconnected from the adapter.
(c) Access Preferences: In the “Settings” menu, select “Preferences”.
(d) Select Units: Choose “Units” from the preferences options.
(e) Set Pressure to “psi”: Find the “Pressure” unit setting and select “psi” from the available options. You can also configure other units on this page according to your preferences for temperature, speed, etc.
(f) Save and Exit: Press the back button to save your unit preferences and return to the main app interface.
With these initial settings configured, you are now ready to create a dashboard and displays to monitor your TPMS data using your obd2 tpms app.
Creating a TPMS Dashboard and Displays
Dashboards in the OBDLink app allow you to customize how you view real-time data. Follow these steps to create a dashboard specifically for TPMS monitoring:
-
Navigate to Dashboards: From the main page of the OBDLink app, tap the “Dashboard” icon, usually located in the lower left corner.
-
Add a New Dashboard: If you don’t have a dashboard already set up for TPMS, tap the vertical ellipses (menu icon) and select “Add Dashboard”. This will create a blank dashboard for you to customize.
-
Add a Display for TPMS Readings: With your new blank dashboard open, tap the menu icon again and select “Add Display”.
-
Choose Digital Gauge Display Type: In the “Display Type” pop-up window, select “Digital Gauge”. This type of display is ideal for showing numerical values like tire pressure. Choose “Dark” from the “Built-Ins” style options for a clean, borderless display.
-
Select TPMS PIDs: In the next pop-up, you’ll see a default PID (Parameter ID), likely “Vehicle Speed”. Ignore this and tap the “Item” dropdown menu (labeled “vehicle speed” with a down arrow).
-
Access Toyota, Lexus, Scion PIDs: On the “Select PIDs” page, choose “Toyota, Lexus, Scion”. If you do not see this option, it indicates that the Enhanced OEM Add-Ons were not correctly installed. Reinstall these add-ons as per the OBDLink MX+ user manual. Selecting this option is crucial for accessing the specific TPMS data relevant to your vehicle using the obd2 tpms app.
-
Navigate to Tire Pressure Monitor PIDs: On the “OEM Add-Ons Select PIDs” page, scroll down and select “Tire Pressure Monitor” in the “Tire Pressure Monitor” section.
-
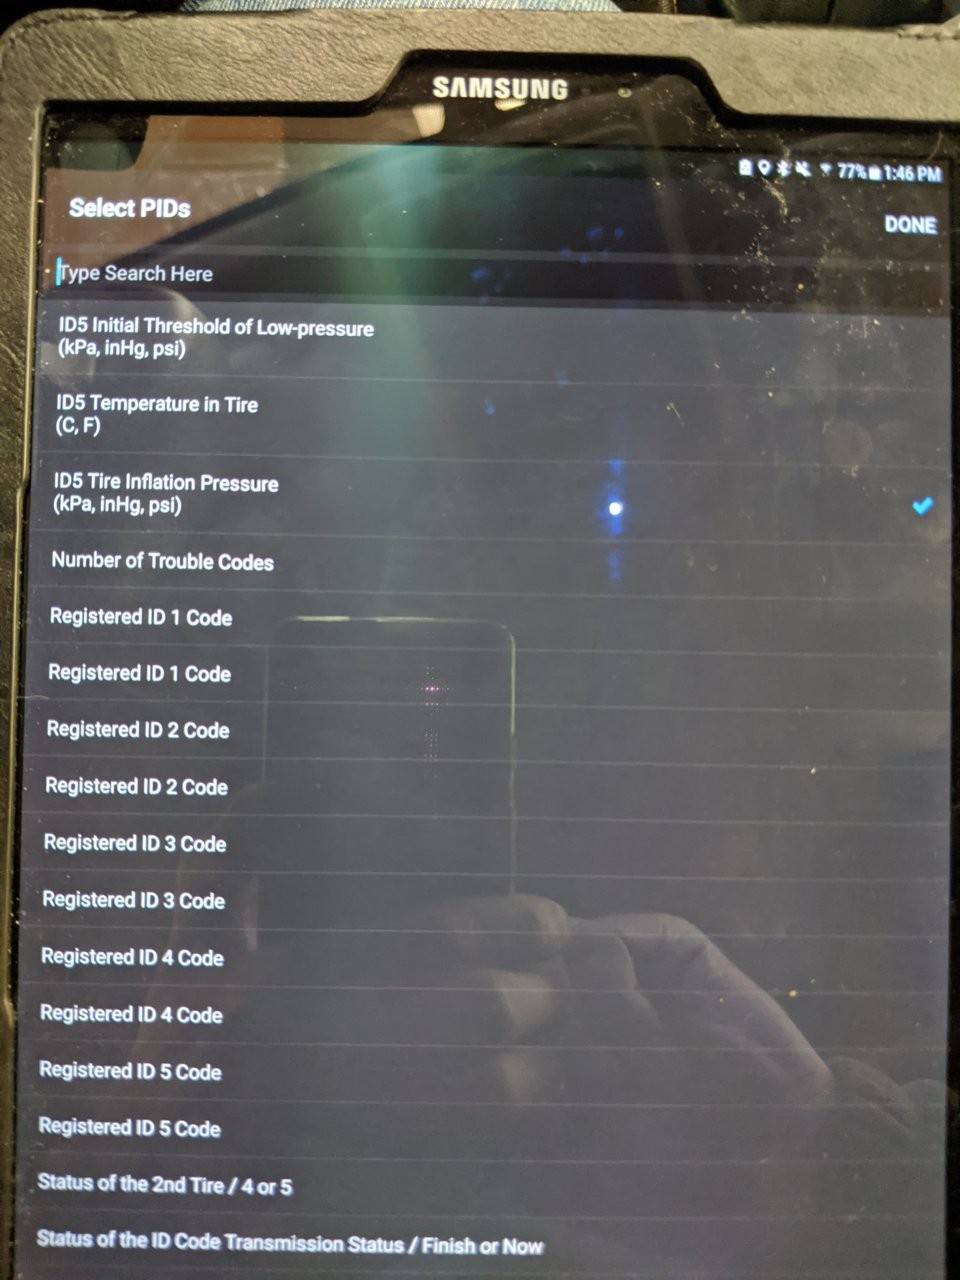
Choose Specific Tire Pressure PIDs: On the “OEM Tire Pressure Monitor Select PIDs” page, you will find a list of TPMS PIDs. The PIDs that worked in the original test were located near the bottom of the page. Scroll to the bottom and then slowly scroll back up to find the ‘ID# Tire Inflation Pressure’ PIDs.
- PID IDs for Tire Positions (Example from original test):
- ID5: Spare Tire
- ID4: Right Front Tire
- ID3: Right Rear Tire
- ID2: Left Rear Tire
- ID1: Left Front Tire
Select the checkbox next to each PID you want to monitor. Don’t worry if you select the wrong PID initially; you can always adjust these settings later. Once selected, tap “Done” at the top of the page.
- PID IDs for Tire Positions (Example from original test):
-
Customize Display Titles: Tap on the default title of the display (e.g., “Vehicle Speed”). A text input will appear. Change the title to something descriptive and shorter, like “Spare PSI”, “RR Tire PSI”, “Left Front PSI”, etc. This makes your dashboard easier to read at a glance. Tap “Done” on the virtual keyboard and then “OK” to save the display to your dashboard.
-
Repeat for Remaining Tires: Go back to the “Select Add Display” section and repeat steps 3-9 for each of your remaining tires, selecting the corresponding TPMS PIDs. You can use the same display style you created earlier for consistency.
-
Customize Display Style (Optional): If you want to further customize the appearance of your displays (e.g., change colors, fonts, or add borders), tap and hold on a display until the “Edit Display” pop-up appears. Select “Style” to access customization options. You can save your customized style for easy application to other displays.
Once you have added displays for all four tires and the spare (if applicable), your TPMS dashboard is ready.
Viewing Real-Time TPMS Data
Now that you have set up your obd2 tpms app and created your TPMS dashboard, you can view real-time tire pressure readings.
-
Plug in MX+ and Start Vehicle: Ensure the OBDLink MX+ adapter is plugged into your vehicle’s OBD II port. Start your vehicle’s engine. The system needs to be running to provide TPMS data; the “key to On” position may not be sufficient.
-
Connect in the OBDLink App: Open the OBDLink app and tap “Connect”.
-
Select Tire Pressure Monitor Network: When prompted by the “Enhanced Network settings” window (because you set “Prompt” earlier), select “Tire Pressure Monitor” and then tap “Connect”.
-
Access TPMS Dashboard: Tap the “Dashboard” icon and swipe left or right to navigate to your TPMS dashboard. You should now see real-time tire pressure readings for each tire displayed on your custom dashboard.
Image: Screenshot showing the location of TPMS Parameter IDs (PIDs) near the bottom of the PID selection list within the OBDLink app, used for configuring tire pressure monitoring.
Image: Screenshot from the OBDLink app prompting the user to select the “Tire Pressure Monitor” network from the Enhanced Network settings, a necessary step to access TPMS data.
Image: Screenshot displaying a customized OBDLink app dashboard showing real-time tire pressure readings in PSI (pounds per square inch), successfully configured using an OBD2 TPMS app and adapter.
Conclusion
Using an obd2 tpms app like OBDLink with an MX+ adapter is a powerful way to monitor your vehicle’s tire pressure in real-time. By following these steps, you can easily set up your app, connect to your vehicle’s TPMS, and create a custom dashboard to display the data. This not only provides convenience but also contributes to safer driving and better vehicle maintenance. Regularly checking your tire pressure with an obd2 tpms app can help you identify leaks early, maintain optimal tire inflation, and ensure a smoother, safer ride. Start leveraging the capabilities of your OBD2 adapter and TPMS app today for enhanced vehicle awareness.