Diagnosing issues in your Mitsubishi Fuso truck efficiently begins with locating the OBD2 port. This essential connector provides access to your vehicle’s computer, allowing you to read diagnostic trouble codes (DTCs) and understand the health of your engine and related systems. As a content creator for obd-de.com and an experienced auto repair specialist, this guide will pinpoint the Mitsubishi Fuso Obd2 Location and explain how to use it for diagnostics, whether you’re using a scan tool or not.
OBD2 Port Location on Mitsubishi Fuso Trucks
The OBD2 port on Mitsubishi Fuso FE, FG, FH, FK, and FM series trucks is typically found inside the cabin. While the exact placement can slightly vary depending on the model year and specific series, you can generally expect to find it on the driver’s side underneath the dashboard.
For specific visual guidance, refer to the images below which highlight typical diagnostic connector locations for various Mitsubishi Fuso models.
Specific Locations by Model Series
FE, FG & FH Series:
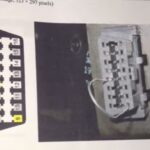
For Mitsubishi Fuso FE, FG, and FH models, the diagnostic connector is often situated within the driver’s side footwell area. Look for a capped connector, usually near the fuse box or relay panel, under the dashboard.
FK & FM Series:
Mitsubishi Fuso FK and FM series trucks generally have the diagnostic port in a similar location to the FE, FG, and FH series. Check under the dashboard on the driver’s side, close to the center console or steering column for the diagnostic plug.
Accessing Diagnostic Trouble Codes (DTCs)
Once you’ve located the diagnostic connector, you can proceed to retrieve diagnostic trouble codes. Mitsubishi Fuso provides methods for accessing these codes both with and without a scan tool.
Accessing DTCs Without a Scan Tool
For FE, FG, FH, FK & FM Electronic Engine Control Systems, you can access DTCs without a scan tool using the diagnosis switch method.
- Locate the diagnosis switch plug connector. This is typically near the diagnostic connector itself.
- Remove the diagnosis switch plug connector.
- Observe the warning lamp on the dashboard. It will begin flashing, displaying the present DTCs through a series of flashes.
Accessing DTCs With a Scan Tool
For a more detailed and user-friendly diagnostic experience, using an OBD2 scan tool is recommended. The connection method varies slightly based on the manufacturing year of your Mitsubishi Fuso.
1996–1998 Models:
For Mitsubishi Fuso models manufactured between 1996 and 1998, use the test connections as illustrated in the figure below when connecting your scan tool.
1999–2008 Models:
For models from 1999 to 2008, including FE, FG, FK & FM series, and 2003-2004 FH models, the scan tool connections are shown in the following figures.
Clearing Diagnostic Trouble Codes (DTCs)
After diagnosing and addressing the issues indicated by the DTCs, you may need to clear these codes. On Mitsubishi Fuso FE, FG, FH, FK & FM models with Electronic Engine Control Systems, this can be done without a scan tool.
- With the diagnosis switch already removed (from the DTC access process).
- Locate and remove the Memory Clear Switch. This switch is also situated at the rear of the relay and fuse box, typically near the diagnostic connector.
- Observe the warning lamp. It will start flashing codes. Record these codes if needed for reference.
- Reconnect the memory clear switch. This action will erase the stored DTCs from the system’s memory.
Interpreting Diagnostic Trouble Codes (DTCs) Without a Scan Tool
When accessing DTCs without a scan tool, the warning lamp flashes a specific pattern to communicate the codes. Here’s how to interpret these flash codes:
- Code Display Start: The control unit initially turns the warning light off for 2.4 seconds to signal the start of the diagnostic code display.
- First Digit: The first digit of the DTC is indicated by the light illuminating for 1.2 seconds, followed by a 1.2-second off period.
- Last Digit: The last digit of the code is shown by the light being on for 0.4 seconds and then off for 0.4 seconds.
- Code Separation: There is a 2.4-second off period between complete DTC codes.
- Multiple Codes: If there are multiple DTCs, each code is repeated three times before moving to the next code after a 2.8-second interval.
- Diagnosis Switch Reconnection: Reconnecting the diagnosis switch will stop the display of DTCs.
By understanding the OBD2 location and diagnostic procedures for your Mitsubishi Fuso truck, you can effectively troubleshoot and maintain your vehicle, ensuring optimal performance and longevity.