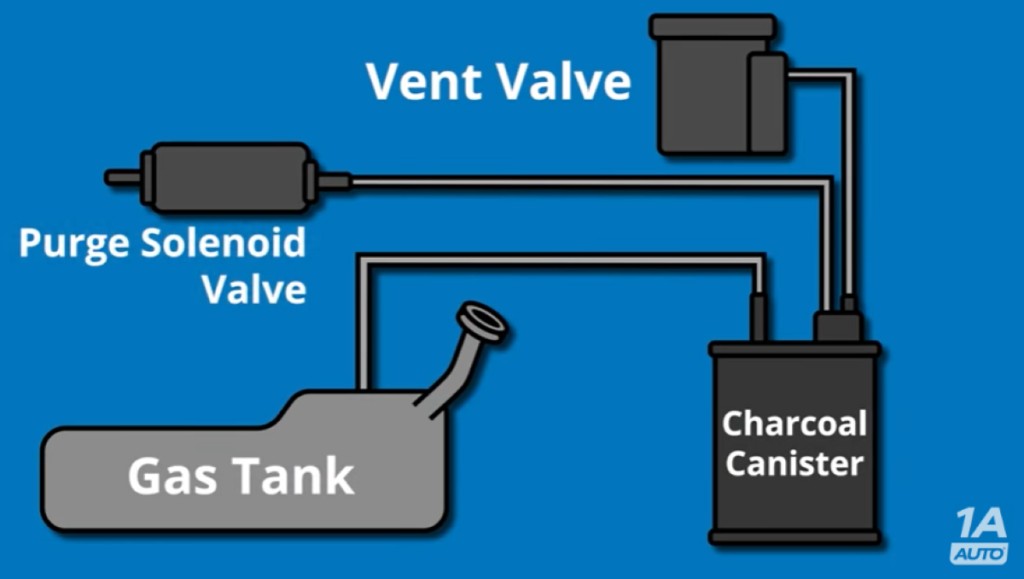
The evaporative emission control (EVAP) system in your vehicle is designed to prevent harmful fuel vapors from escaping into the atmosphere. A common issue that can trigger your check engine light is an EVAP leak. While sometimes the fix is simple, other times it requires a more thorough inspection. If your OBD-II scanner is showing an EVAP system code, particularly a small leak code like P0442, understanding the symptoms and potential causes is the first step to resolving the problem. Let’s delve into what Small Evap Leak Symptoms you should be aware of and how to identify them.
Understanding the EVAP System and Small Leaks
Before we discuss the symptoms, it’s helpful to understand the basics of the EVAP system. This system captures fuel vapors from the fuel tank and prevents them from venting directly into the air. These vapors are temporarily stored and then purged into the engine to be burned during normal operation. A “small evap leak” refers to a minor breach in this sealed system. Even a tiny leak can disrupt the system’s pressure and be detected by your car’s computer, leading to a check engine light.
Common Small EVAP Leak Symptoms
While a large EVAP leak might present obvious signs, small leaks can be more subtle. Here are the primary symptoms associated with a small EVAP leak:
Check Engine Light and EVAP Codes (P0442, P0455, and others)
The most common and often first sign of a small EVAP leak is the illumination of the check engine light. When your vehicle’s computer detects a pressure imbalance in the EVAP system, it will trigger the check engine light and store a corresponding diagnostic trouble code (DTC). Codes like P0442 (Evaporative Emission Control System Leak Detected – Small Leak) and sometimes P0455 (Evaporative Emission Control System Leak Detected – Gross Leak) can indicate an EVAP leak. While P0455 suggests a larger leak, a small leak can sometimes escalate or be miscategorized initially. Always use an OBD-II scanner to confirm the code and understand the specific issue.
No Obvious Symptoms
One of the trickiest aspects of small EVAP leaks is that they often don’t present any noticeable drivability issues. Unlike a major engine problem, your car might run, accelerate, and idle seemingly normally. This is why the check engine light is such a crucial indicator. Don’t ignore a check engine light, even if your car seems to be operating fine. A seemingly minor EVAP leak can still contribute to emissions issues and potentially worsen over time.
Potential Difficulty Refueling (in some cases)
Although less common with small leaks, if the leak is affecting the charcoal canister or vent valve, you might experience difficulty refueling your vehicle. This is more typical of a blocked or failing charcoal canister, but a leak in the system can sometimes contribute to pressure imbalances that make it harder to pump gas smoothly. If you notice the gas pump repeatedly shutting off when you’re trying to fill your tank, and you also have a check engine light, an EVAP system issue, even a small leak, could be a contributing factor.
Diagnosing Potential Small EVAP Leaks
If you suspect a small EVAP leak based on the symptoms above, here’s a step-by-step approach to diagnosing the issue:
1. Check and Retighten Your Gas Cap
The simplest and most frequent cause of a small EVAP leak is a loose or faulty gas cap. Ensure your gas cap is properly tightened until it clicks (if applicable to your vehicle). Inspect the gas cap for any cracks, damage to the sealing gasket, or general wear and tear. A faulty gas cap cannot maintain a proper seal, leading to a small EVAP leak. If the gas cap looks damaged or doesn’t seem to tighten correctly, replacing it is an inexpensive first step. Also, inspect the fuel filler neck for rust or debris that could prevent a good seal.
2. Inspect the Charcoal Canister, Vent Valve, and Purge Valve
These components are key parts of the EVAP system and are common culprits for leaks.
- Charcoal Canister: Located typically near the fuel tank, inspect the canister for any visible cracks or physical damage, especially on plastic components that can become brittle over time. Also, check the hoses connected to the canister for cracks, disconnections, or damage.
- Vent Valve: The vent valve is often near the charcoal canister and can fail due to corrosion or debris. Inspect it for physical damage and check hose connections.
- Purge Valve: Usually located in the engine compartment, the purge valve controls the flow of vapors to the engine. Check for cracks, damage, and hose conditions. A faulty purge valve can leak or fail to close properly.
3. Hose and Line Inspection
Carefully examine all the hoses and lines connected to the EVAP system components. Look for cracks, splits, disconnections, or areas where hoses might be dry-rotted or damaged. Small cracks in hoses are common sources of small EVAP leaks.
4. Professional Smoke Test
If visual inspection doesn’t reveal the leak, a professional smoke test is often necessary. A smoke test involves using specialized equipment to introduce smoke into the EVAP system. The escaping smoke will pinpoint the exact location of even a small leak. This test is best performed by a qualified mechanic.
Conclusion
Small EVAP leaks, while often subtle in their symptoms beyond the check engine light, are important to address. Starting with a gas cap inspection and moving towards component and hose checks can help you pinpoint the issue. Remember, a seemingly minor problem in the EVAP system can impact emissions and potentially lead to further complications if left unaddressed. For quality replacement parts to fix your EVAP leak and get your car running efficiently, explore the selection at 1aauto.com, where you can also find helpful videos to guide your repairs.

