The On-Board Diagnostics II (OBD2) port is an essential feature in modern vehicles, including your Mini Cooper. This port allows you to access your car’s computer system for diagnostics and monitoring. Knowing where to find the OBD2 connector in your Mini Cooper is the first step in understanding your vehicle’s health and performance. This guide will help you locate your Mini Cooper’s OBD2 port and understand its importance.
Understanding the OBD2 Connector in Your Mini Cooper
OBD2 is a standardized system that has been mandatory in most cars sold in North America since 1996 and in many other markets around the world shortly after. It provides a wealth of information about your vehicle’s engine, emissions system, and other key components. For Mini Cooper owners, the OBD2 port is crucial for several reasons:
- Diagnostics: When your check engine light illuminates, an OBD2 scanner connected to this port can read diagnostic trouble codes (DTCs). These codes pinpoint potential issues, helping you understand why the light is on and what might need attention.
- Maintenance: Beyond error codes, OBD2 scanners can provide live data about your Mini Cooper’s engine performance, such as engine temperature, RPM, and sensor readings. This information can be valuable for preventative maintenance and monitoring your car’s condition.
- Performance Monitoring: Enthusiasts can use OBD2 data to track performance metrics and understand how modifications affect their Mini Cooper.
Where to Find the OBD2 Port in Your Mini Cooper
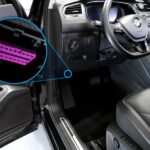
In all Mini Cooper models, including R50, R52, R53, R55, R56 and later generations, the OBD2 port is located in a standardized location within the passenger compartment. You can typically find it:
- Under the Dashboard: The most common location is beneath the dashboard on the driver’s side.
- Near the Steering Column: Look in the area below the steering wheel and above the pedals.
- Kick Panel Area: It might be positioned near the kick panel, which is the trim panel on the side of the footwell.
The OBD2 port is usually quite visible once you know where to look. It’s a 16-pin, trapezoid-shaped connector. You won’t need any tools to access it; it’s designed for easy access.
While the location is generally consistent across Mini Cooper models (R50-R56), always refer to your owner’s manual for the most precise location for your specific model year, especially if you own a newer generation Mini.
How to Use the OBD2 Connector on Your Mini Cooper
Using the OBD2 port is straightforward. Here’s a simple guide:
- Locate the OBD2 Port: Follow the instructions above to find the port in your Mini Cooper.
- Plug in your OBD2 Scanner: Ensure your vehicle is turned off. Connect your OBD2 scanner or diagnostic tool to the port.
- Turn on the Ignition (or Start the Engine): Follow the instructions for your specific OBD2 scanner. Some scanners require the ignition to be in the “ON” position (without starting the engine), while others need the engine running.
- Follow Scanner Instructions: Navigate the scanner’s menu to perform diagnostics, read codes, or access live data as needed.
Remember to consult the user manual for your OBD2 scanner for detailed operating instructions and compatibility information.
By understanding the location and function of the OBD2 connector in your Mini Cooper, you can take a proactive approach to vehicle maintenance and diagnostics, ensuring your Mini stays running smoothly for years to come.