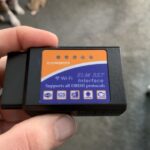
Ensuring your vehicle’s On-Board Diagnostics (OBD2) port is functioning correctly is crucial for accurate vehicle diagnostics and the use of various automotive accessories. If you’re looking to use devices like the gaugeART CAN OBD Link, verifying the communication protocol of your OBD2 port is the first essential step. This guide will walk you through how to test your OBD2 port using a multimeter, specifically focusing on checking for CAN (Controller Area Network) communication, a standard protocol in most modern vehicles. This test is particularly useful for vehicles manufactured around the 2005-2008 timeframe, or for models sold outside of the USA, where CAN implementation might be less straightforward.
Understanding the Importance of CAN Communication in OBD2 Ports
Before diving into the testing procedure, it’s important to understand why CAN communication is relevant. Modern vehicles rely heavily on electronic control units (ECUs) that manage various systems, from the engine and transmission to braking and safety features. CAN bus is a robust communication network that allows these ECUs to communicate with each other efficiently. For OBD2 devices that require real-time data from your vehicle’s systems, CAN communication is often a necessity. While vehicles sold in the USA from 2008 onwards are mandated to have CAN communication in their OBD2 ports, older models or vehicles from other markets may or may not be equipped with it. This is where testing becomes essential to ensure compatibility, especially if you are intending to use CAN-dependent devices.
Step-by-Step Guide to Testing Your OBD2 Port for CAN Communication
This test involves a few simple steps and requires a multimeter, a common tool available at most hardware stores or online. Always ensure your vehicle is parked safely and the ignition is turned off before proceeding with any electrical testing.
1. Locate Your Vehicle’s OBD2 Port
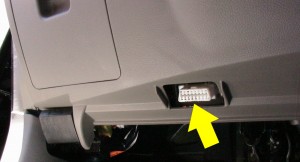
The first step is to find your vehicle’s OBD2 port. By regulation, OBD2 ports are required to be located within the passenger compartment of the vehicle. In most cars, especially newer models, you’ll typically find it on the driver’s side, underneath the dashboard area. It’s often near the steering column or in the lower center console area. The port is usually trapezoidal in shape and may have a protective cover. Refer to your vehicle’s owner’s manual if you are having trouble locating it.
2. Identify Terminals 6 and 14 on the OBD2 Port
Once you’ve located the OBD2 port, you need to identify terminals 6 and 14. These are the specific pins used for the CAN High and CAN Low communication lines respectively. You can refer to an OBD2 port pinout diagram to help you locate these terminals. Typically, pin 6 is located towards the top row on the left side, and pin 14 is on the bottom row, also on the left side when looking at the port. Inspect the port closely. If your vehicle is equipped with CAN communication at the OBD2 port, you should see metallic contacts inside terminals 6 and 14. If these positions are empty or filled with plastic, it indicates that your vehicle likely does not have CAN communication at the OBD2 port.
3. Perform a Resistance Test with a Multimeter
If you’ve confirmed the presence of metallic contacts in terminals 6 and 14, the next step is to perform a resistance test using a multimeter. This test will verify if the CAN bus is properly terminated, which is a good indication of its presence and functionality.
Steps for Resistance Testing:
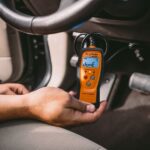
- Set your Multimeter to Ohms (Ω): Turn on your multimeter and set it to measure resistance (Ohms – Ω). You’ll typically find this setting indicated by the Omega symbol (Ω). Select a range that is suitable for measuring around 60 Ohms; often, a 200 Ohm range is appropriate if your multimeter has selectable ranges.
- Ensure Ignition is OFF: It’s critical to remove the ignition key and ensure the vehicle is completely turned off before proceeding with the resistance test. This prevents any potential electrical issues or inaccurate readings.
- Connect Multimeter Probes: Carefully place one probe of your multimeter on terminal 6 and the other probe on terminal 14 of the OBD2 port. It does not matter which probe goes to which terminal for a resistance measurement. Ensure you are making good contact with the metallic terminals.
- Read the Resistance Value: Observe the reading on your multimeter. If your vehicle is equipped with a properly terminated CAN bus at the OBD2 port, you should read a resistance value of approximately 60 Ohms (Ω), with a tolerance of +/- 2 Ohms. A reading within the range of 58 to 62 Ohms is generally considered a pass for this test.
Interpreting the Results
- Reading of Approximately 60 Ohms: This indicates that your vehicle is very likely equipped with CAN communication at the OBD2 port and is compatible with devices like the gaugeART CAN OBD Link. The 60 Ohm resistance is a characteristic of a properly terminated CAN bus, which uses two 120 Ohm resistors in parallel (resulting in 60 Ohms) at each end of the bus.
- Reading of Approximately 120 Ohms: A reading around 120 Ohms might suggest that only one terminating resistor is present or that the CAN bus is not correctly configured at the OBD2 port. While it’s less common, some systems might present this reading. Further investigation might be required.
- Reading of Infinite Resistance (OL or 1. on many multimeters): This typically indicates an open circuit or no connection between pins 6 and 14, suggesting that CAN communication is likely not present at your OBD2 port, or there might be an issue with the wiring.
- Reading of 0 Ohms or Very Low Resistance: This could indicate a short circuit between the CAN High and CAN Low lines, which is not typical but could occur due to wiring faults. This would require further diagnostic investigation.
Conclusion: Verifying OBD2 Port CAN Communication for Compatibility
Testing your OBD2 port with a multimeter for CAN communication is a straightforward process that can save you time and ensure compatibility with CAN-dependent automotive devices. By following these steps, you can confidently determine if your vehicle’s OBD2 port is equipped with CAN communication by checking for the presence of metallic contacts at terminals 6 and 14 and verifying the resistance between these pins is approximately 60 Ohms. This simple test empowers you to make informed decisions about using OBD2 accessories and ensures seamless integration with your vehicle’s diagnostic and communication systems. If you are unsure about the results or encounter unexpected readings, consulting a qualified automotive technician is always recommended.