For BMW enthusiasts seeking to maximize the performance of their OBD2-equipped vehicles, the OBD1 conversion is a well-trodden path. Often touted as a straightforward “electronics swap,” the reality is a bit more intricate. This guide dives deep into the OBD2 to OBD1 conversion process, focusing on the crucial Obd2 Obd1 Harness, and providing you with a comprehensive understanding to undertake this modification successfully. Drawing from hands-on experience and detailed research, we aim to equip you with the knowledge to navigate this upgrade effectively and unlock your engine’s full potential.
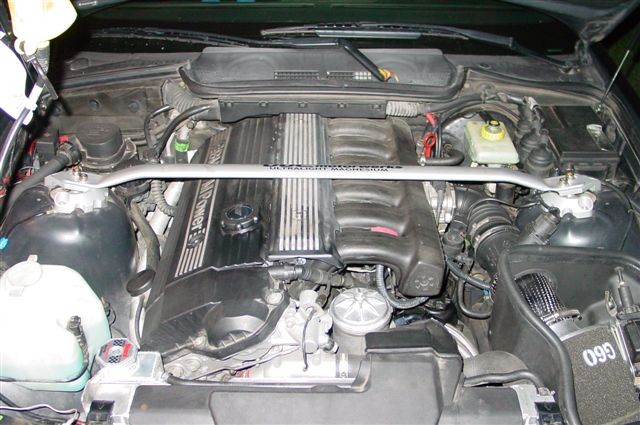
Before embarking on this journey, let’s visualize the starting point. Here’s a snapshot of a typical OBD2 S52 engine bay prior to the conversion:
This conversion centers around replacing the OBD2 engine management system with the earlier, yet often preferred, OBD1 system. For this guide, we’ll be referencing a 1999 M3 with OBD2 and EWS (Electronic Immobilizer System), upgrading to OBD1 using components from a 1994 325i, including an OBD1 engine harness and a red-label 413 ECU, along with a performance chip.
Essential Components for Your OBD2 to OBD1 Conversion
To successfully convert your OBD2 system to OBD1, you’ll need a specific set of parts. Here’s a detailed checklist to get you started:
- OBD1 Harness: This is the backbone of the conversion, facilitating the electrical interface with the OBD1 ECU and sensors.
- OBD1 ECU (413 “red label”): Favored for their origin in non-EWS vehicles, simplifying the integration process.
- OBD1 Performance Chip: Optimizes engine performance with the OBD1 setup.
- OBD1 Intake Manifold: Known for superior airflow compared to OBD2 manifolds, contributing to performance gains.
- OBD1 Fuel Rail: Designed to work with the OBD1 fuel delivery system.
- OBD1 Crank Position Sensor: Essential for engine timing and synchronization with the OBD1 system.
- OBD1 Cam Position Sensor: Works in conjunction with the crank sensor for precise engine management.
- OBD1 Knock Sensors (x2): Protects the engine from detonation by detecting abnormal combustion.
- OBD1 Oxygen Sensor: Single sensor system for OBD1, unlike the multiple sensor setup in OBD2.
- OBD1 HFM (Hot-Film Air Mass Meter): Measures intake airflow for the OBD1 ECU.
- OBD1 Main Engine Coolant Hose: The larger hose connecting to various cooling system components, designed for OBD1 configuration.
- OBD1 Throttle Boot: Connects the throttle body to the intake system, specific to OBD1.
- OBD1 Throttle Body (Optional): While OBD2 throttle body can be adapted, OBD1 offers a direct fit.
- OBD1 Valve Cover and Coil Packs (Optional): Can simplify coil pack wiring but requires OBD1 coil packs.
While conceptually straightforward, this conversion involves numerous details that demand careful attention. Let’s delve into some critical aspects:
Navigating the Nuances of OBD1 Conversion
1. Valve Cover and Coil Pack Considerations
The OBD2 valve cover’s design doesn’t accommodate the OBD1 coil pack wiring, which enters from the driver’s side, unlike the OBD2’s passenger-side entry. You have two main choices:
- Retain OBD2 Valve Cover: This allows you to keep your OBD2 coil packs. You’ll need to slightly modify the valve cover, possibly using a Dremel, to route the OBD1 wiring.
- Switch to OBD1 Valve Cover: This necessitates using OBD1 coil packs but provides a direct fit for OBD1 wiring.
Both OBD1 and OBD2 coil packs are compatible with the OBD1 harness, so the choice is based on ease of wiring and aesthetic preference. Many choose to keep the OBD2 valve cover for its modern look and then adapt it for the OBD1 harness.
Here’s a visual comparison of OBD2 and OBD1 coil setups:
2. Vanos Solenoid Wiring
The OBD2 Vanos solenoid connector has a shorter wire than its OBD1 counterpart. To address this, you can either:
- Use an OBD1 Solenoid: Direct swap for guaranteed compatibility.
- Extend OBD2 Solenoid Wiring: Utilize BMW part # 12-52-2-274-971, a transmission harness with compatible connectors, to extend the OBD2 solenoid wiring to reach the OBD1 harness.
3. Coolant Pipe Adaptations
The main coolant pipe from the timing cover differs significantly between OBD1 and OBD2. OBD2 uses a fixed metal pipe, while OBD1 employs a rubber hose connected to an aluminum neck. Solutions include:
- OBD1 Timing Cover Swap: Replacing the OBD2 timing cover with an OBD1 version ($100 approx.) for direct OBD1 hose compatibility.
- Coolant Pipe Adapter: Using an adapter ($20 approx.) from brands like Bimmerworld, Active Autowerkes, or Turner Motorsport. This adapter fits into the OBD2 timing cover and allows for the use of the OBD1 coolant hose.
4. Intake Manifold Upgrade for Performance
A key benefit of the OBD1 conversion is the opportunity to use the M50 intake manifold. This manifold offers improved airflow compared to OBD2 (M52/S52) manifolds, directly contributing to performance gains. The OBD1 manifold will bolt directly onto M52/S52 cylinder heads without modifications. It includes an air temperature sensor and a vacuum port for the fuel pressure regulator on its underside.
5. Throttle Body Compatibility
You can retain your OBD2 throttle body, but adaptation is required to ensure proper sealing with the OBD1 intake manifold. Options include:
- Adapter Plate: A $20 plate placed between the OBD2 throttle body and OBD1 manifold, accommodating both gasket types.
- Extended Gasket: A $15 gasket designed to bridge the gap and seal the OBD2 throttle body to the OBD1 intake manifold.
- OBD1 Throttle Body Swap: The simplest solution for a direct fit, eliminating the need for adapters.
6. Coolant Temperature Sender Configuration
OBD2 utilizes a single coolant temperature sender, while OBD1 uses two. To adapt:
- Wiring Splice: Splice the OBD1 harness wiring and use the OBD2 connector to connect to the single OBD2 sender.
- Coolant Temp Sender Adapter: A plug-and-play adapter ($50 approx.) from Turner Motorsport simplifies the wiring adaptation.
7. Crank Position Sensor Relocation
The OBD2 crank position sensor is on the engine block, while OBD1’s is on the timing cover. You must use an OBD1 crank position sensor and install it on the timing cover. The OBD2 sensor can be left in place to plug the hole in the block.
8. Fuel Line Modifications
Significant differences exist in fuel delivery systems between OBD2 and OBD1. Key changes involve:
- OBD2 Fuel Rail: Fuel lines attach at the rear, and the pressure regulator is under the car near the fuel filter.
- OBD1 Fuel Rail: Supply line at the front, return line at the rear, and the fuel pressure regulator is integrated into the fuel rail.
You must switch to an OBD1 fuel rail. This requires:
- Removing the OBD2 fuel pressure regulator from under the car.
- Routing new 8mm fuel lines to the OBD1 fuel rail.
- Bridging the gap left by the OBD2 regulator with new fuel lines, connecting the fuel filter feed to the front of the OBD1 rail and the return to the under-car return line.
- Connecting the OBD1 fuel pressure regulator vacuum line to the vacuum port on the OBD1 intake manifold.
9. PCV System Adaptation
The Positive Crankcase Ventilation (PCV) systems differ between OBD2 and OBD1. Solutions depend on your valve cover choice:
- OBD2 Valve Cover: Retain the OBD2 PCV system and mount the breather valve (cone-shaped valve) under the intake manifold.
- OBD1 Valve Cover: Use the OBD1 breather valve, clipping it to the crankcase vent port. Connect the OBD1 valve’s vacuum line to the ICV-to-intake manifold plug and the oil drain line to the dipstick.
- Breather Catch Can: An alternative is to run a hose from the crankcase vent to a breather catch can.
10. Idle Control Valve (ICV)
The ICVs are identical between OBD1 and OBD2. You can reuse your OBD2 ICV. You’ll need to source the correct connector and hoses for connecting the ICV to the OBD1 intake manifold and throttle boot vacuum port.
11. Fuel Tank Breather Valve
The OBD2 fuel tank breather valve can be reused. You’ll need fittings to connect its vacuum hose to the vacuum port on the OBD1 throttle boot. Hardware store barb fittings (3/8” and 5/8”) can be adapted for this purpose.
12. Oxygen Sensors and Secondary Air Pump Elimination
OBD1 systems use a single pre-catalytic converter oxygen sensor, unlike OBD2’s multiple sensors and secondary air pump. During conversion:
- Secondary Air Pump Removal: This OBD2 emissions system is entirely removed.
- O2 Sensor Reduction: Eliminate the two pre-cat and two post-cat OBD2 O2 sensors. Plug the sensor ports with M18 bolts (Toyota Land Cruiser oil pan drain bolts are compatible).
- OBD1 O2 Sensor: Install a single pre-cat OBD1 oxygen sensor.
13. Oil Pan and Dipstick Compatibility
Contrary to some misconceptions, the OBD2 oil pan and dipstick are fully compatible with the OBD1 conversion and do not require replacement.
14. EWS (Electronic Immobilizer System) Deactivation
EWS presence varies across E36 models. Even with a non-EWS ECU, ignition issues can arise. A simple wiring modification addresses this:
- ECU Connector Modification: Locate wire #66 on the ECU connector (typically solid green or black/violet). Cut this wire and insulate both ends with electrical tape to bypass EWS.
15. Power Distribution and Grounding
Crucially, disconnect the negative battery terminal before working on power and grounding. Label all connections before disassembly.
- OBD2 Power Distribution Box Relocation: The OBD2 distribution box needs slight relocation to reach the OBD1 harness power connections. Removing the secondary air pump frees up mounting holes to reposition the box closer to the firewall.
- Ground Connections: Identify and securely reconnect all ground wires. Note the ground connection under the OBD diagnostics port and the small ground wire from the spark plug rail (ground to the engine hoist loop on the Vanos unit).
- Power Feeds: Ensure correct reconnection of power feeds, including the main feed, starter feed, and fuse box feed. Red wires are typically power, and brown or black wires are ground.
16. General Wiring Best Practices
- Label Everything: Before disconnecting anything, meticulously label each connector on the OBD2 harness using painter’s tape and a marker, referencing Bentley wiring schematics. This is critical for successful reassembly.
- Photographic Documentation: Take photos of power, ground, and starter wiring connections during disassembly to aid in reconnection.
Conclusion: Unleashing OBD1 Performance
The OBD1 conversion, while demanding attention to detail, is a rewarding upgrade for OBD2 BMWs. By carefully addressing each component and following these guidelines, you can successfully integrate an obd2 obd1 harness and unlock the performance benefits of the OBD1 engine management system.
This conversion allows for greater tuning flexibility and, when paired with performance modifications, can significantly enhance your BMW’s driving experience.
Here’s a look at the completed OBD1 S52 conversion:
Initial dyno results after the conversion showed 253 RWHP and 228 TQ. Fine-tuning the chip yielded further improvements, reaching 262 RWHP and 230 TQ, demonstrating the performance potential unlocked through this upgrade.
This guide aims to provide comprehensive insights into the OBD2 to OBD1 conversion, empowering you to undertake this project with confidence and achieve enhanced performance from your BMW.